
Evergreen Workstation Getting Started
- Intro To Evergreen and Workstation Setup PowerPoint v. 4-21-2025 (printable)
- Column Configuration Essentials Guide includes recommendations and steps for setting up columns and list displays.
Where to look for help
- Search the WLS IT Wiki
http://it.westchesterlibraries.org/
What is Evergreen?
Sometimes referred to as the Staff-client, Evergreen is an open-source* library software that assists libraries in day-to-day operations such as checking out materials, keeping track of users (patrons), placing and filling holds, and linking/adding items to the catalog.
(*Open-source software means that Evergreen is a software that is utilized and developed by multiple library systems throughout the world. It’s a group effort to maintain, build, and enhance this product – which is why some features need to be voted on by the Evergreen community before they can be implemented into the ILS.)
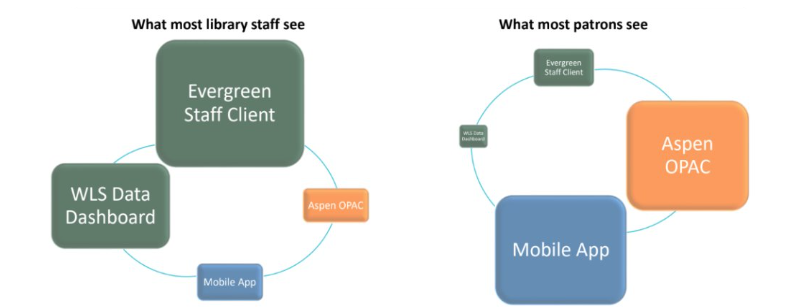
The ILS…. What is it?
The Integrated Library System (ILS) is made up of multiple parts: The Evergreen Staff-client, The Aspen OPAC (Online Public Access Catalog), Mobile App, and WLS Data Dashboard.
Staff Client vs. OPAC
Staff Client:
- Refers to Evergreen and is used by staff in day-to-day workflows.
- It allows staff to search the staff catalog, place and manage holds, check-out and check-in items, register and edit patrons, add and edit items in the catalog, and run reports to collect data.
OPAC:
- (Online Public Access Catalog)
- Refers to the public, or patron catalog.
- Allows patrons to search the catalog, place and manage their holds, create reading lists, manage their reading history (if turned on).
- Each library in the system has a branded version of the OPAC.
Go to –
- Sign In
- Register a Workstation
- Staff Who Work at Multiple Libraries
- Warning Messages and Permission Errors
- Browser Setup
- Evergreen Essential Guides
- Evergreen Keyboard Shortcuts
Evergreen “Getting Started” Checklist
- [ ] Sign in to Evergreen
- [ ] Register a workstation
- [ ] Set your library defaults
- [ ] Import templates; receipts, holdings, spine labels
- [ ] Customize and save your columns
Signing In 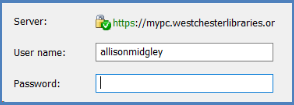
- Log into your VDI session with your Active Directory (AD) credentials
- eg. Username: firstname.lastname
Password: YourPassword! - Wait for Windows to load.
- eg. Username: firstname.lastname
- Click the New Evergreen Client icon on the desktop. Microsoft Edge will open. If needed, sync your Edge Settings. If you had Chrome bookmarks and settings, here’s how to Import Your Chrome Bookmarks and Settings into Edge.

- Sign in to Evergreen with your Active Directory (AD) credentials
eg. Username: firstname.lastname
Password: YourPassword!
As long as you are logged into Edge, you may save the password
You will see a “Please register a workstation” screen.
- In the browser, go to Settings.
- Search for “cache.”
- Click Choose what to clear. Deselect Cookies and other site data.
- Click Clear now.
- Sign in to Evergreen again.
Evergreen Workstations
Every staff member that uses Evergreen is required to have a registered Evergreen Workstation for the location that they work at.
Workstations are unique to the user in that they will retain your column customizations, default preferences and will prioritize your location in all other workflows.
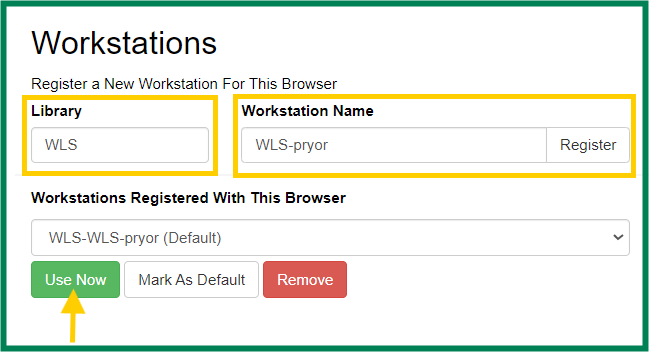
Register a Workstation
Register a workstation by opening the Administration drop-down menu > Workstation > Registered Workstations.
- Use the Library dropdown menu to choose your 3-letter library code. (Do NOT select a code that starts with S_.)
- In the Workstation Name box, repeat your 3-letter library code-your last name. I.e., BDH-smith
- If multiple staff at your library have the same last name, add letters from the first names until the workstation name is unique, I.e., for Alan Smith and Arlene Smith: BDH-smithal; BDH-smithar.
- Click Register.
- Click Use Now to continue to the Sign In screen.
- Verify that the Workstation name is registered with the browser.
- Enter your Username and Password and Sign in.
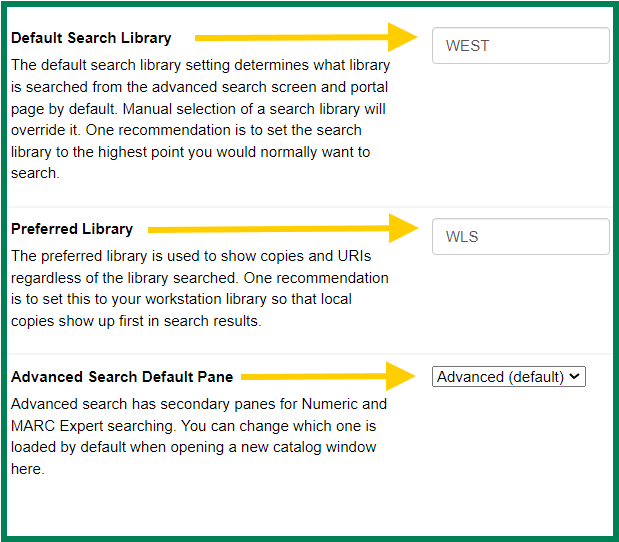
Workstation: Set Library Defaults
- Go to the Administration drop-down and select Workstation.
- Default Search Library: Set to WEST. Default search will show all available titles and copies in the system when searching the catalog.
- Preferred Library: Set your library 3-letter code. The Preferred library will always display your library at the top of the detailed summary screen if your library owns copies.
- Advanced Search Default Pane: Set to Advanced.
- You do not need to “Save” these defaults. These settings will stay when you exit the page.
- On the right-hand side of your screen, set your defaults:
Workstations for Staff Who Work at Multiple Libraries
Staff will need to set up a workstation for each library they work at.
- At the next library, log in with the first registered workstation information.
- Go to Administration > Workstation > Registered Workstations.
- From the drop-down, choose the 3-letter code of the other library you work at/are currently in at the time of registering.
- Enter the “new” workstation name in the same format as your other workstation names, i.e. ABC-lastname.
- Choose the new name from the Workstations Registered With This Browser dropdown.
- Click Use Now.
- Sign in to the “new” workstation.
Staff must pick the right workstation for their location every time they log in.
Re-Register a Workstation
From time-to-time, you may have to re-register your workstation. This typically occurs if your Chrome profile is not synced, you update Chrome, or there was a software update for Evergreen. After signing in, if Evergreen prompts you to re-register your workstation:
- Enter the workstation name you have been using.
- An alert will display: “Workstation name already exists. Use it anyway?” Click OK/Continue.
- Continue to sign into Evergreen.
All of your defaults, columns and template will be available in your workstation.
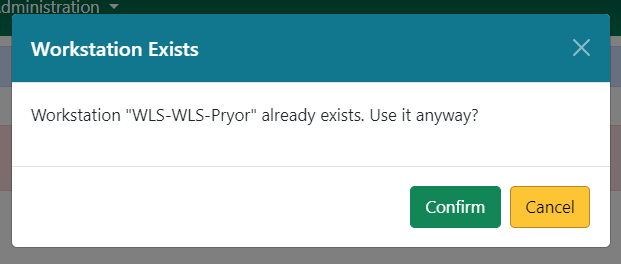
Note: If you do not see the above alert message when re-registering your workstation, this indicates that you entered the workstation name incorrectly. Try again until you see that message. If the issue persists, contact the helpdesk.
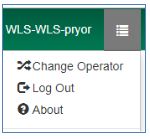
To Log Out
- In the top-right corner of the window, click the menu button to the right of your user name
- Select Log Out
Workstation: Import Templates
There are multiple templates available in Evergreen.
Available Templates include:
- Print Templates (receipts and any printable page within Evergreen).
- Holdings Templates (Used in Tech. Services. Allows Staff to quickly link new items to the catalog).
- Spine Label Templates (Used in Tech. Services. Allows staff to quickly print spine labels without needing to reconfigure every time.
Templates allow staff at libraries to have access to the same format and information. Templates are typically set up by one person at the library and exported to the library’s share folder. New staff are expected to import any necessary templates they may need for their duties.
Default receipt templates are available in Evergreen. Receipt templates and Holding (also referred to as item/copy/volume) templates that have your library’s customizations are stored in the web browser. Your supervisor or tech staff will create “master copies” and save them to your library share folder so they can be imported to quickly re-create templates when the library makes changes, acquires new staff computers, or if the web browser history on a staff computer is cleared.
Work with your supervisor to figure out which templates you will need for your workstation.
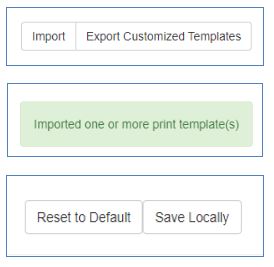
- To import Receipt templates, go to Administration > Workstation > Print Templates.
- Open the Import button in the top right corner of your screen. Your Library Share drive will open allowing you to access the correct with the saved receipt template file. Select the file and click Open.
- A note will appear in the bottom right corner of your screen stating, “ Imported one or more print template(s).
- Select Save Locally.
- To import Holdings templates, go to Administration > Local Administration > Holdings Template Editor. Repeat steps 1 – 3.
- To import Spine Label templates, scan an item barcode into Item Status. Select the item and open the Actions drop-down menu. Repeat steps 1 – 3.
Customize Your Columns
From Patron Search to Item Status, Evergreen will have columns as part of the display. The default columns often display random and irrelevant information.
Because it makes the Evergreen experience easier to use and understand, customizing the columns to display relevant information is an ESSENTIAL part of the “Getting Started” process after you register a workstation.
- Check out the Column Configuration guide (linked) for easy access on choosing the right columns for each screen.
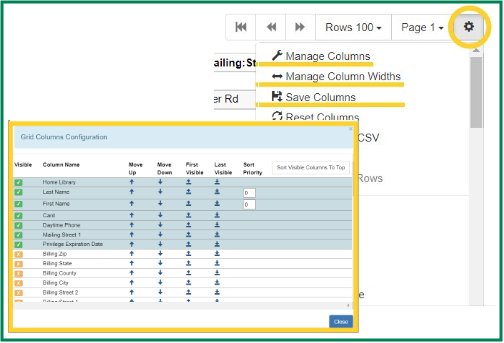
To Customize Columns
- Click the gear icon to the right of “page 1.”
- Open Manage Columns.
- Click Sort Visible Columns To Top.
- Choose columns:
- Columns with a green checkmark will display.
- Columns with an orange X are hidden.
- Sort Visible Columns to top as needed.
- Use the blue arrows to move the columns up (to the left of the list) or down (to the right) until they are in the suggested order.
- When finished, Close.
- From the dropdown, click Save Columns.
Evergreen Account Vs. Staff Card
Anyone that lives, works, goes to school, or owns property in Westchester County is permitted ONE library card in the system. However, an exception is made for library staff!
Library staff can have a personal library card for their home library, and a staff card* for the library that they work at.
If you were to look yourself up in Patron Search, you may find two to three entries listed. Take a look at the Card and Profile columns to see what kind of cards you may have. Clicking on the barcode will take you to the account page.
*Staff that work at multiple libraries are only permitted the one staff card.

If you see a firstname.lastname formatted barcode, this is merely your Evergreen username and is not an actual user profile. Do NOT use this profile for any workflows.
Evergreen Essential Guides
Below are the essential guides that will best acquaint you with the most common Evergreen workflows.
Circulation in Evergreen
Circulation in Evergreen includes the following actions:
- Checkout
- Checkin
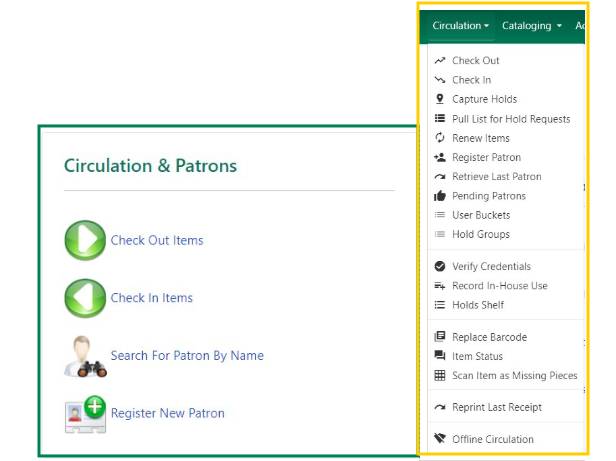
- Capture Holds
- Pull Lists for Hold Requests
- Renew Items
- Register Patrons
- User Buckets
- Hold Shelf
- Replace Barcode
- Item Status
- Scan Item As Missing Pieces
- Reprint Last Receipt
User Guides:
- Evergreen Circulation Essentials (checkout, checkin, renewal, patron search, patron registration, patron updates, lost card, card renewal, patron hold notifications)
- Daily Maintenance Essentials (processing the Holds Pull List, clearing the holds shelf, accessing lost notices)
Tech. Services
Technical Services pertains to the linking, editing, deletion and general maintenance of items linked to your library’s collection a spart of the catalog.
- Tech Services Essentials (adding, editing, and deleting items, printing labels, using items/holdings templates)
- Catalog Search Essentials (basic search, advanced search, keyword search tips, display and filtering options)
Reference
- Catalog Search Essentials (basic and advanced search, keyword search tips, display and filtering options, placing holds)
- Evergreen Circulation Essentials (checkout, checkin, renewal, patron search, patron registration, patron updates, lost card, card renewal, patron hold notifications)
Department supervisors should be familiar with the corresponding essential guides listed above, as well as
- Local Administration Essentials (holdings templates, cash reports, closed dates editor, transit lists)
- Daily Maintenance Essentials (processing the Holds Pull List, clearing the holds shelf, accessing lost notices)
Common Evergreen Terms
| In Evergreen | In SirsiDynix Workflows |
|---|---|
| Check in/Check out | Check in/Check out |
| Backdated Check In | Bookdrop Checkin |
| Amnesty Mode | Fine Free Checkin |
| Shelving Location | Home Location |
| Item Status | Most similar to Current Location |
| Circulation Modifier (Circ Mod) | Item Type (iType) |
| Owning Library | Item Library |
| Statistical Category (Item or Patron) | Item Category or User Category |
| Penalties and Blocked | Bills and Delinquent/Blocked |
| Place a hold | Place a hold |
| Suspend a hold | Suspend a hold |
| Activate a hold | Unsuspend a hold |
| Title Level Hold | Title Hold |
| Item Level Hold | Copy Level Hold |
| Pull List For Holds Requests | OnShelf Hold List |
| Capture a hold | Trap a hold |
| Non-Cataloged Item Checkout/Count | Ephemeral charge/in-house use count |
| Holdings or Call Number/Item Editor | Call Number & Item Maintenance |
| Not OPAC Visible | Shadowed |
| Workstation | Client/computer |
| Password (still the last 4-digits of the phone number!) | PIN |
Evergreen Hotkeys (Keyboard Shortcuts)
Many of Evergreen’s features can be activated by a keyboard shortcut (also called a “hotkey” in some documentation.) The following is a list of keyboard shortcuts currently supported in Evergreen.
| Keyboard Shortcut/Hotkey | Action |
|---|---|
| F1 | Check out |
| F2 | Check in |
| F3 | Search Catalog |
| F4 | Search Patrons |
| F5 | Item Status |
| F8 | Retrieve last patron |
| F9 | Reprint last receipt |
| Shift+F1 | Register patron |
| Shift+F2 | Capture holds |
| Shift+F8 | Retrieve last record |
| Ctr+F2 | Renew |
Common Internet Browser shortcuts
| Ctr+N | New browser |
|---|---|
| Ctr+T | New browser tab |
| Ctr+W | Close browser tab |
| Ctr+F5 | Refresh/Reload page |
| Home | Go to top of page |
| End | Go to bottom of page |
Warning Messages and Permission Errors
In Evergreen, each user belongs to a group that gives them permission – or allows them – to complete tasks. Each library, through its director and/or TechXpert, lets WLS know to which group a user belongs. There are over 500 permissions used to allow work to be completed.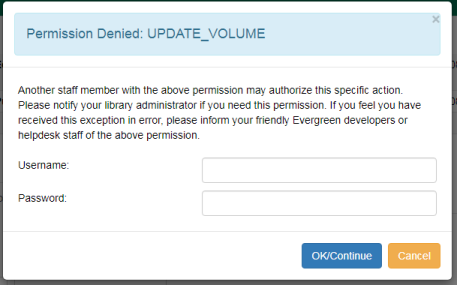
- A permission error occurs when the group to which a user belongs does not have the permission needed to complete a task.
- A warning message occurs when Evergreen sees that a questionable action is about to be taken so that staff confirms the action.
![]()
For a warning message, change the column display to help clarify why the action is questionable.
For example, when deleting an item, you see the popup Permission denied: COPY_DELETE_WARNING.override.
Add Copy Status to the columns display so that you can determine if the copy is
- available and allowed to be deleted or
- lost or checked out and not be eligible to be removed from the system.
With this added information, you can click OK/Continue to confirm the action or Cancel to not complete it.
For a permission error, you will not be able to complete the task without a supervisor login.
For example, when transferring an item from one title to another, you see the popup Permission denied: UPDATE_VOLUME. If a supervisor also cannot complete the task, they should contact the helpdesk so that the permission can be added. Please include
- the text of the error and a description of what you were trying to do when you got it
- a screenshot of the error message you received, preferably by using the Snipping tool
Browser Setup
- WLS has setup the Chrome browser
- Evergreen is the Home Page
- Pop-ups are allowed
- Cookies will not be cleared so that staff doesn’t lose login information, receipt and volume/copy templates
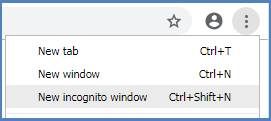
- DO NOT use incognito mode for Evergreen
- DO NOT clear cookies or browser data
To search or work outside Evergreen so that data can be deleted,
- use another browser (firefox is recommended) or
- go to Customize Google> New incognito window
Reporting Web Client Bugs
Bugs can be reported to your supervisor who will pass them on to WLS. If you report a bug, remember to redact or obscure any information that might personally identify a patron whose record might otherwise be referenced in the attached bug report or screenshots.