
Evergreen Maintenance
- Evergreen Maintenance Essentials v.5_17_2022 (printable)
Daily Maintenance
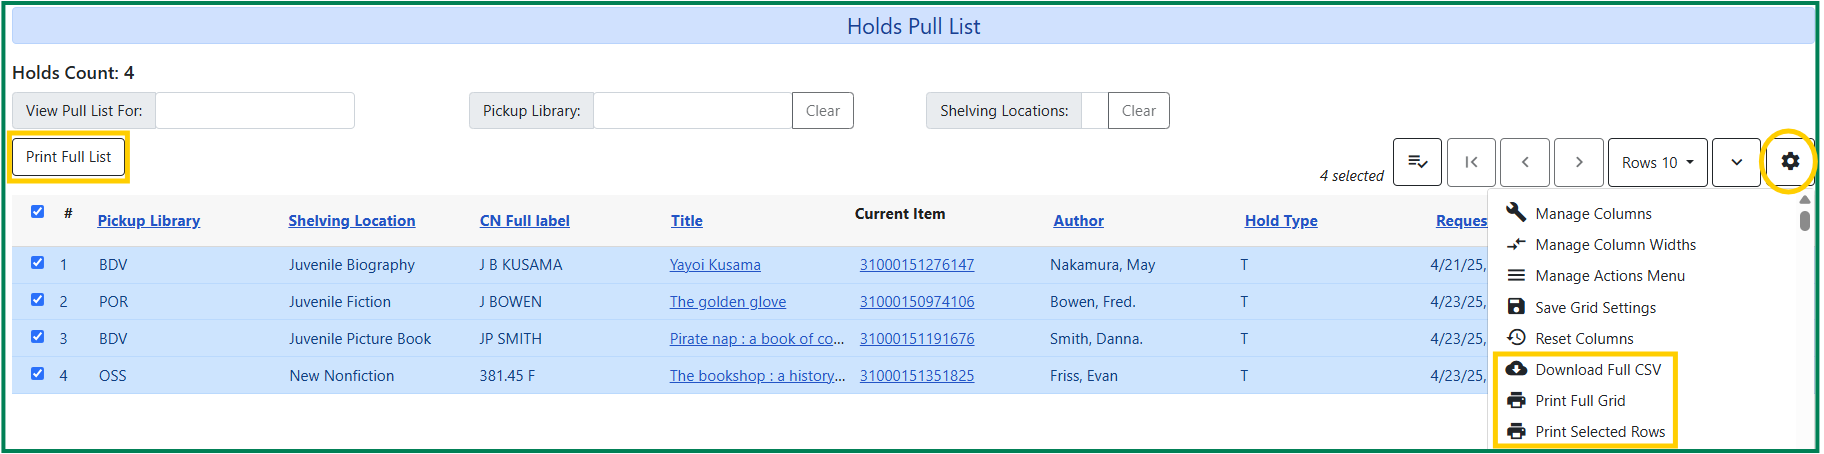
Holds Pull List
The Holds Pull List is updated constantly. Once an item on the list is no longer available or a hold on the list is captured, the items will disappear from the list. The Holds Pull List should be printed at least once a day. Typically, libraries will print first thing in the morning and an hour or two before they close.
To retrieve your Holds Pull List,
- Open the Circulation dropdown menu and click the Pull List for Hold Requests link.
- The Holds Pull List will be displayed. You can re-sort the display by clicking the column headers. You can also add fields to the display by using the column picker. (Column adjustments will only affect the screen display and the CSV download for the holds pull list. It will not affect the printable holds pull list.)
- Print your list using any of the options below.
- Additionally, library staff can also use the Actions menu to edit items on the Holds Pull List, such as Cancel Hold, Find Another Target, Mark Item as Damaged, Mark Item as Discard/Weed, or Mark Item as Missing if necessary.
Printing the Holds Pull List
The following options are available for printing the pull list:
- Print Full Pull List button: Prints Title, Author, Shelving Location, Call Number and Item Barcode. This method uses less paper than the alternate strategy.
- Download CSV: This option is available from the List Actions button (gear icon) and saves all fields in the screen display to a CSV file. This file can then be opened in Excel or another spreadsheet program. This option provides more flexibility in identifying fields that should be printed.
- Print Full Grid: This option is available from the List Actions button (gear icon) and will print the entire Holds Pull List, including every column displayed as well as gridlines.
Note: With the CSV option, if you are including barcodes in the holds pull list, you will need to take the following steps to make the barcode display properly: in Excel, select the entire barcode column, right-click and select Format Cells, click Number as the category and then reduce the number of decimal places to 0.
Capturing Holds
Holds can be captured when a checked-out item is returned (checked in) or an item on the Holds Pull List is retrieved and captured. When a hold is captured, the hold slip will be printed and if the patron has chosen to be notified by email, the email notification will be sent out. The item should be put on the hold shelf.
- To capture a hold, select Circulation → Capture Holds (or press Shift-F2).
- Scan or type barcode and click Submit.
- The following hold slip is automatically printed. If your workstation is not setup for silent printing (via Hatch), then a print window will appear.
- If the item should be sent to another location, a hold transit slip will be printed. If your workstation is not setup for silent printing (via Hatch), then another print window will appear.
NOTE: A captured hold with a status of On Hold Shelf can be cancelled by either staff or patrons. But the status of the item will not change until staff check it in.
Handling Missing and Damaged Items
If an item on the holds pull list is missing or damaged, you can change its status directly from the holds pull list. Evergreen will update the status of the item and will immediately retarget the hold.
From the Holds Pull List, right-click on the item and either select Mark Item Missing or Mark Item Damaged.
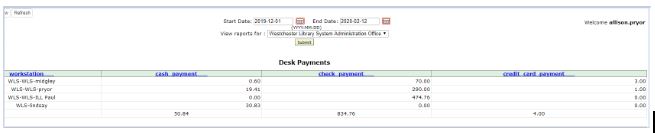
Cash Reports
Cash reports are useful for quickly getting information about money that your library has collected from patrons. This can be helpful in a few different scenarios, such as:
- Reconciling a cash drawer at the end of the day.
- Seeing how popular a specific payment type is (perhaps when evaluating a food-for-fines program).
Evergreen payments are divided into two different types:
- Desk payments in which a staff member simply accepted a credit card, check, or cash payment. These are associated with the staff person’s workstation.
- User payments in which a staff member had to make a specific decision about whether to accept a payment of goods or work; or forgave or granted credit to a particular patron. These payments are associated with the user. Note: If a staff member works at more than one location, user payments are associated with their home library.
To use the cash reports,
- Go to Administration > Local Administration > Cash Reports.
- Select the time period and library you are interested in. Click Submit.
Accessing Lost Notices
While logged into Evergreen, access to print notices is available at https://egstaff.westchesterlibraries.org/notices/index.html.
If you bookmark the page, you can right-click the bookmark and open in a new tab for easy, daily access.
When the page loads, follow your library link. Dates for which your library has notices appear in descending order. Lost notices are available for 1 month, in keeping with the WLS privacy policy.
Note: The Lost Notices Link has been known to act intermittently. If you can’t access the lost notices, wait 30 minutes and try again. If this does not work, email the WLS IT Help Desk (support@wlsmail.org).
Because Notices expire after a month, you may want to download and save your library’s Lost Notices into a folder in your library share drive.
Weekly Maintenance
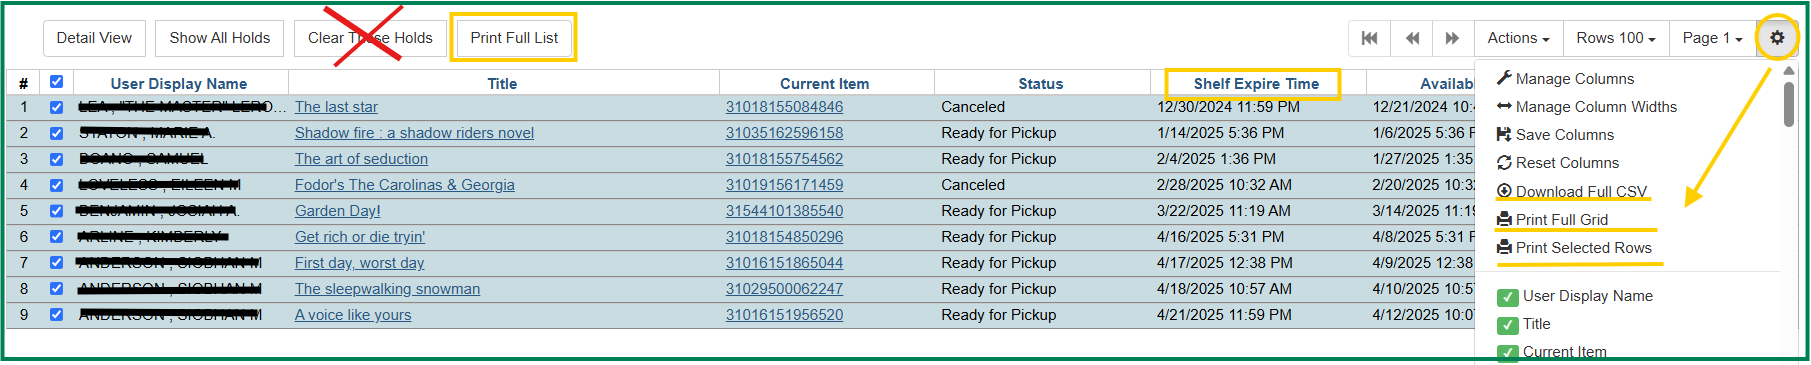
Clear Expired Holds
Patrons have 8 days to pick their holds up. After that time frame, holds are considered expired. However, there is no Hold Expired status, because while Evergreen knows that the item is on the Holds shelf, even if past the pick up date – it’s technically still available for pickup. This is why we need to regularly check the Hold Shelf in the “Show Clearable Holds” view.
In the Show Clearable Holds tab,
- Sort by the Expired Hold Shelf Column.
- Select expired holds, and then click the Print these holds button.
- Additionally, you can also open the Settings (gear icon) menu, and
- Download Full CSV (will open as a spreadsheet, and you can customize as needed)
- Print Full Grid
- Print Selected Rows
- Use the printed to pull the expired items off the shelf.
- Once you have the items off the shelf, you’ll need to open Checkin in a new tab.
- BEFORE you scan the items, open the Checkin Modifiers dropdown menu (bottom right corner) and turn on Clear Hold Shelf. This will remove the pre-existing hold status an free it up.
- Scan the items.
Monthly Maintenance
Transit List
The transit list is used to track items that have been in the delivery longer than expected; the process includes canceling transits, marking items missing, and retargeting holds. The best practice is to check the list monthly.
- Go to Administration → Local Administration → Transit List. Your library will already be selected. First process the Transits To list, and then process the Transits From list.
- Sort the list by column header
- Shelving Location to check shelves
- Send Date/Time column header to sort the list by the oldest transit date to the newest.
- Barcode column header if you would like to sort your library’s items first.
- To print the Transit List, use the drop-down menu to the right of the page sorter and choose Print Full Grid.
- Check your shelves for any items on the list.
For Your Library’s Items
- If found, select the items and choose Cancel Transit to change the transit status. This action prevents the patron holds from lingering indefinitely.
- A confirmation pop-up displays that indicates if there are holds associated with the transit and will re-target those holds.
- Click Cancel Transit. The transits disappear from the list, and the copy status changes to “Canceled Transit.”
- If not found, cancel the transits as above and then add the items to a bucket.
- Go to Cataloging > Item Buckets. Choose your bucket and edit the status of the items to Missing. Note: permissions may be needed to change the item status.
For Another Library’s Items
- If the item is found and meant to fill a hold at your library, go to the patron record to verify the hold.
- Check the item in to change the hold status for Ready For Pickup.
- If the item is not found and wad meant to fill a hold at your library, open the title link in a new tab.
- On the View Holds tab, select the item and go to Actions>Find a new target. This will prompt the system to look again for another copy.
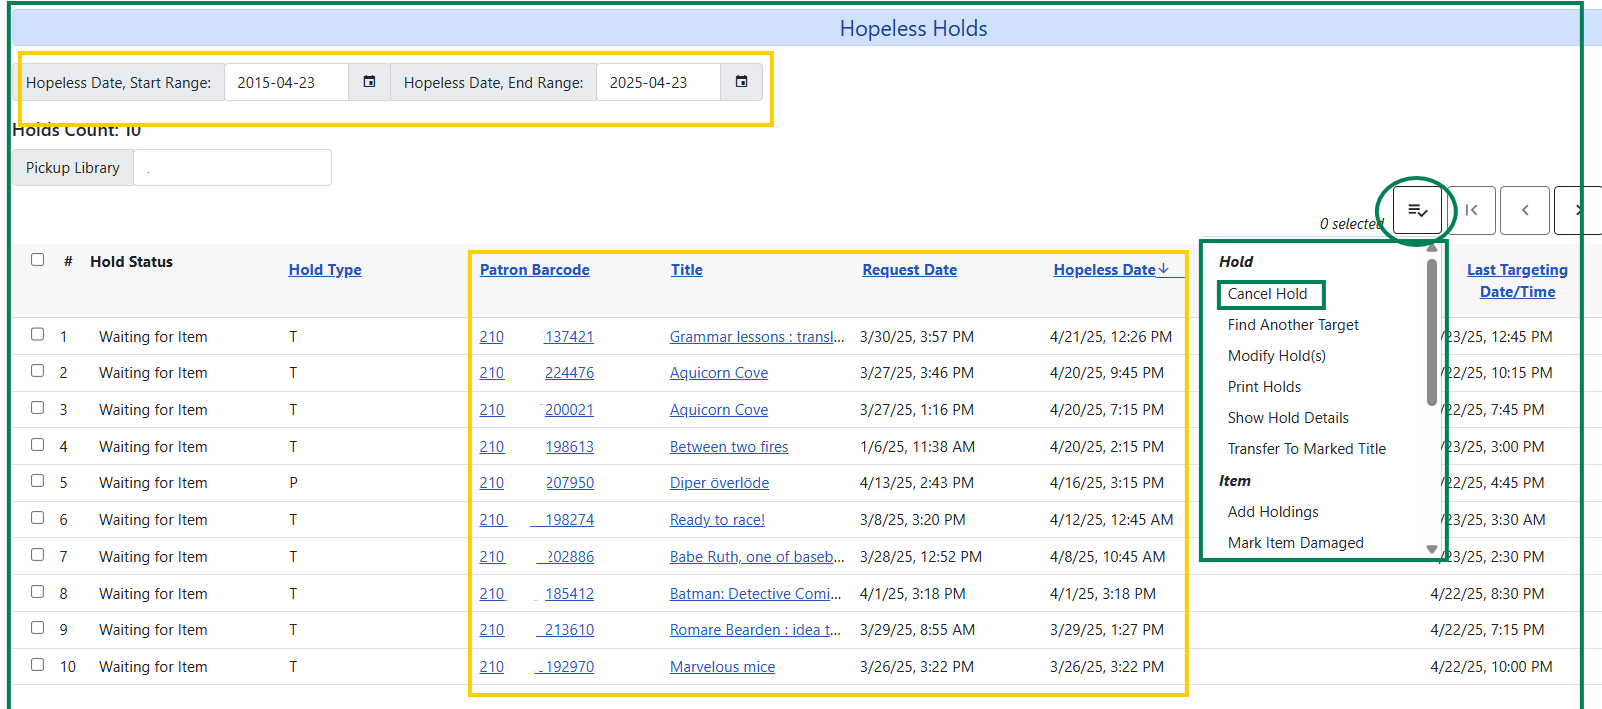
Hopeless Holds
Unfulfillable holds are colloquially known as “hopeless holds.” Holds become hopeless when there are no available copies that can fill a patron’s hold; typically this happens when the only copy linked to a title record is marked lost, or has been deleted form the catalog.
These need to be checked fairly regularly so that staff can contact patrons and let them know that the hold will not be filled.
From the Local Administration menu,
- Open the Hopeless Holds link.
- Make sure to have the following columns displayed: Patron barcode, Title, Request Date, and Hopeless Date
- Click on the linked Title. A new tab will open with the Title record summary, and you will be able to see what may be causing the hold to be hopeless (I.e. Lost status or no linked copies.)
- After verifying that there are no available copies in the catalog, go back to the Hopeless Holds interface and open the patron’s account by clicking on their barcode. Notify the patron that the hod needs to be cancelled due to no available copies. Optional: Offer to place an ILL request to have the book sent from outside of the system!
- Back at the Hopeless Holds page, select all hopeless holds, open the Actions menu, and cancel them.
Quarterly Maintenance
Closed Dates Editor
To add or edit regularly scheduled library hours or closed days of the week, such as every Sunday, send a help desk request to helpdesk@wlsmail.org.
Not to be confused with Library Hours, where Evergreen sets your library’s regular hours for the days of the week, the Closed Dates Editor is used to set your library as closed for the day for events such as holidays, bad weather days, or emergency closures. When setting the Closed Dates, Evergreen automatically adjusts due dates, hold dates, and fines.
- Due dates. Due dates that would fall on closed days are automatically pushed forward to the next open day. Likewise, if an item is checked out at 8pm, for example, and would normally be due on a day when the library closes before 8pm, Evergreen pushes the due date forward to the next open day.
- Overdue fines. Overdue fines may not be charged on days when the library is closed. This fine behavior depends on how the Charge fines on overdue circulations when closed setting is configured in the Library Settings Editor.
To add a scheduled closed date,
- Go to Administration → Local Administration → Closed Dates Editor
- Click Add closing.
- For a single closed date, choose Closing Type Closed One Full Day and select that date from the calendar.
- For multiple days, choose Closing Type Multiple Days and select a Start and End Date.
- Enter a reason (optional)
- Click OK.
To delete a scheduled closed date,
- Right click, and click Delete closing.
- Go to Administration → Local Administration → Closed Dates Editor
- Select the row with the date that you want to remove.
For information on updating your library’s Closed Dates Editor, please see the Local Administration Essentials guide.