
Evergreen Circulation Essentials
- Evergreen Circulation Essentials-3.6-v3.24.2022 (printable)
- Evergreen Circulation Essentials Practice v10-18-2022 (printable)
Visit the Circulation Policies page to view the system-wide policies agreed upon by the Circulation Committee.
Checkout Basics
Checkout can be initiated from the Home screen, in the “Circulation and Patrons” menu, or in the Circulation drop-down menu.
To initiate Checkout, begin by scanning the patron’s library card, or use the Patron Search button in the top-right corner of the checkout screen to pull up the patron’s account.
Search For Patron
- Expand the search fields and make sure the search includes:
- All Profile Groups
- All Libraries (WEST)
- Inactive users
- Enter the user’s last name and first initial. The names that match your search entry display.
Click a user name to select the patron and open their profile.
Checkout
- Scan the item barcode in the Barcode(s) field.
- Click Done to send a receipt in the patron’s default preference (email and/or print) and check out materials to the next user.
Other Options
- Press the Enter key to open the Done dropdown and choose the receipt type or no receipt
- Click Quick Receipt to send a receipt in the patron’s default preference and stay in the patron record.
Common Checkout Workflows
Blocked Patron – Patron Exceeds Fine Threshold
A patron will exceed the fine threshold when they reach $25 in fines.
- Continue to check out.
- Pay the bill.
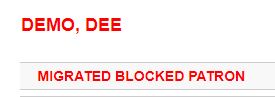
Migrated Blocked Patron
Migrated Blocks are patron accounts that were blocked before we “migrated” to the Evergreen ILS.
- Pay the bill.
- Go into Messages, manually archive the alert and refresh the page.
- Continue to check out.
Circulation Overrides
Item alerts may appear at checkout with important information about that item/circulation. Remember! Read each alert pop-up carefully to be sure you want to override each exception.
Batch Overrides are enabled to minimize the number of times staff need to click through an exception.
- Evergreen will “remember” the designated override during a single patron session.
- Three possible actions for batch overrides:
- Force Action applies the action for all remaining items in the batch.
- Skip does not apply the action for all remaining items.
- Cancel aborts all remaining items in the batch.
Open Circulation or Open Hold Request
Occasionally at checkout, an item alert stating “Open hold request” will pop up. In Evergreen, it’s possible to checkout on a card other than the original requestor.
- Continue to check out.
- Select Force Action
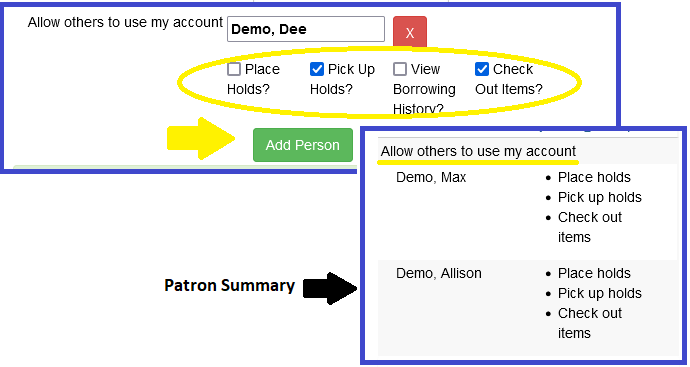
Patron B comes in to check out a hold for Patron A; “Allow Others to Use My Account”
“Allow Others to Use My Account” is an option for patrons to give permission to other people to place and pick-up/checkout holds with their card. Settings can be saved in the Edit tab and will appear in the patron summary.
- Verify Patron B’s ID.
- Continue to check out ON THE REQUESTOR’S CARD.
Renew Items
Renewals can be initiated from the Circulation drop-down menu or by using the Actions menu in the Items Out tab in the patron’s profile.
- Through the Circulation menu
- Click Circulation → Renew Items.
- Scan or enter the barcode.
- Through the patron’s record
- From the Items Out tab, select the items.
- Open the Actions menu → Renew.
Checkin Basics
Checkin can be initiated from:
- the Home screen
- the “Circulation and Patrons” menu
- the Circulation drop-down menu
Checkin
From Check In:
- Scan the item barcode.
- WATCH THE SCREEN FOR ALERTS (hold, in transit, item notes, etc.) Follow up as needed.
- If there is an overdue fine associated with the checkin, an alert will appear at the top of the screen with a fine tally for the current checkin session. To immediately handle fine payment, click the alert to jump to the patron’s bill record.
- Continue to scan items until all items are checked in.

Checkin Modifiers
Choose one or more Checkin Modifiers. Check-ins are modified until manually unchecked.
Red alert displays at top of the screen.
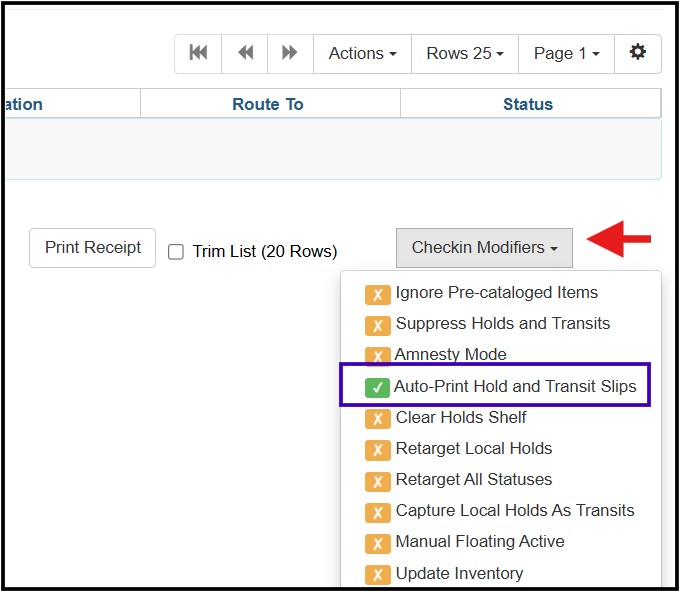
*In most circumstances, only Auto-Print Hold and Transit Slips is set during normal checkin.*
| Ignore Pre-cat Items | No prompt when checking in a pre-cat item. Item will be routed to Cataloguing |
| Suppress Holds and Transit | The item will not be used to fill holds or sent in transit. Item has Reshelving status. |
| Amnesty Mode/Forgive Fines | Overdue fines will be voided if already created or not be inserted if not yet created (e.g. hourly loans). |
| Auto-Print Hold and Transit Slips | Slips will be automatically printed without prompt for confirmation. |
| Clear Holds Shelf | Checking in hold-shelf-expired items will clear the items from the hold shelf (holds to be canceled). |
| Retarget Local Holds* | When checking in in-process items that are owned by the library, attempt to find a local hold to retarget. This is intended to help with the proper targeting of newly-cataloged items. |
| Retarget All Statuses | Similar to Retarget Local Holds, this modifier will attempt to find a local hold to retarget, regardless of the status of the item being checked in. This modifier must be used in conjunction with the Retarget Local Holds modifier. |
| Capture Local Holds as Transits | With this checkin modifier, any local holds will be given an in-transit status instead of on holds shelf. |
*NOTE: The retarget holds checkin modifiers should not be set during normal checkin, as local holds should be prioritized at normal checkin by default (this is set up through system configuration), and the checkin modifiers add extra processing time to the checkin which can cause problems, especially for titles with many holds. The recommendation is to use them ONLY when tech services staff is adding new holdings and first putting them into circulation.
Common Checkin Workflows
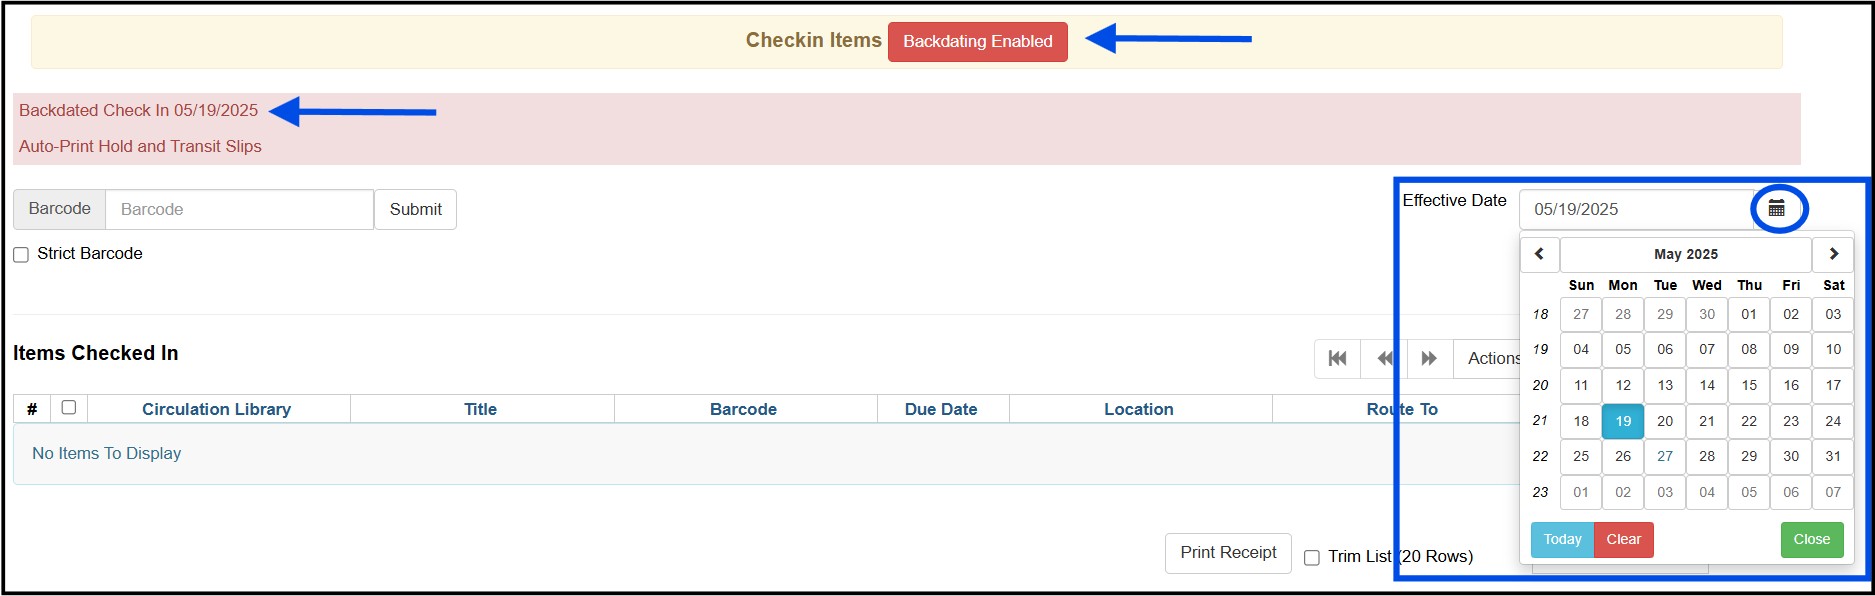
Backdated/Book-drop Checkin
Back-dated Checkin, also known as Book-drop Check-ins, will reset items that may have become overdue or accrued fines overnight.
To initiate a back-dated check:
- Use the calendar widget to change the effective date of check-ins
- A red alert banner will display at the top indicating “Backdated Checkin”
- To return the effective date to “today”
- Refresh the page
- Choose another menu option
- Use the calendar to return to Today or clear the date
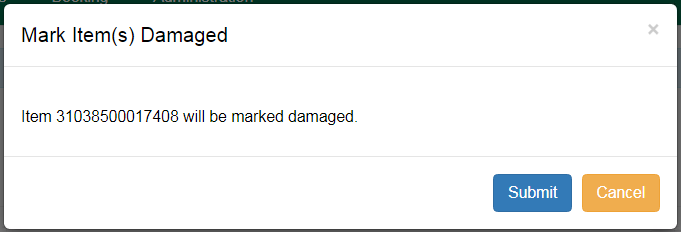
Mark Item Damaged
To mark an item damaged at checkin,
- Check the item in.
- Select the item and right-click or open the Actions menu>Mark Items Damaged. The Mark Item(s) Damaged pop-up will display.
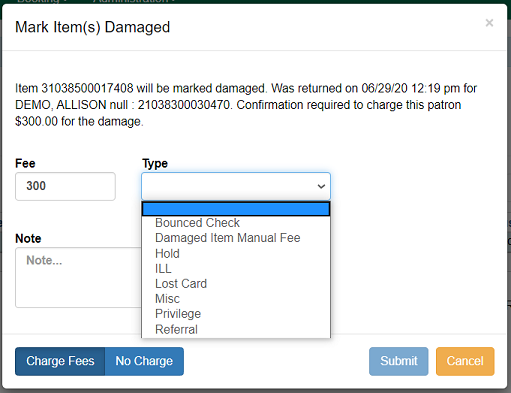
- Click Submit. The second Mark Item(s) Damaged popup displays item and patron information, the default price, and options for charging the patron.
- In the Mark Item(s) Damaged popup,
To charge the full amount, add a note and click Submit.
To charge a different amount,
- Enter or use the scroll arrows to choose a different amount
- Choose the Type Damaged Item Manual Fee
- Add a Note
- Click Charge Fees
To charge no fee, click No Charge
Common Circulation Workflows
Pull List for Hold Requests
The Holds Pull List is updated constantly. Once an item on the list is no longer available or a hold on the list is captured, the items will disappear from the list. The Holds Pull List should be printed at least once a day. Typically, libraries will print first thing in the morning and an hour or two before they close.
To retrieve your Holds Pull List:
Additionally, library staff can also use the Actions menu to edit items on the Holds Pull List, such as Cancel Hold, Find Another Target, Mark Item as Damaged, Mark Item as Discard/Weed, or Mark Item as Missing if necessary.
Open the Circulation dropdown menu and click the Pull List for Hold Requests link.
The Holds Pull List will be displayed. You can re-sort the display by clicking the column headers. You can also add fields to the display by using the column picker. (Column adjustments will only affect the screen display and the CSV download for the holds pull list. It will not affect the printable holds pull list.)
Print your list using any of the options below.
Lost Notices
While logged into Evergreen, access to print notices is available at https://egstaff.westchesterlibraries.org/notices/index.html.
If you bookmark the page, you can right-click the bookmark and open in a new tab for easy, daily access.
When the page loads, follow your library link. Dates for which your library has notices appear in descending order. Lost notices are available for 1 month, in keeping with the WLS privacy policy.
Note: The Lost Notices Link has been known to act intermittently. If you can’t access the lost notices, wait 30 minutes and try again. If this does not work, email the WLS IT Help Desk (support@wlsmail.org).
Because Notices expire after a month, you may want to download and save your library’s Lost Notices into a folder in your library share drive.
Transit Lists
The transit list is used to track items that have been in the delivery longer than expected; the process includes canceling transits, marking items missing, and retargeting holds. The best practice is to check the list monthly.
- Go to Administration → Local Administration → Transit List. Your library will already be selected. First process the Transits To list, and then process the Transits From list.
- Sort the list by column header
- Shelving Location to check shelves
- Send Date/Time column header to sort the list by the oldest transit date to the newest.
- Barcode column header if you would like to sort your library’s items first.
- To print the Transit List, use the drop-down menu to the right of the page sorter and choose Print Full Grid.
- Check your shelves for any items on the list.
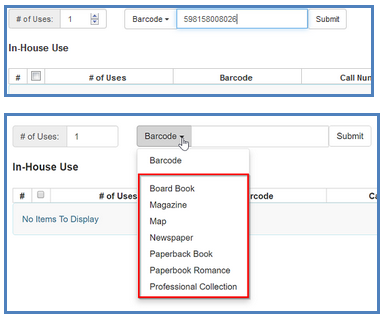
In-house Use (F6)
The statistics of in-house use are separated from circulation statistics. The in-house use count of cataloged items is not included in the items’ total use count.
From Circulation → Record-In House Use or press F6:
- To record in-house use for cataloged items, enter the number of uses, and scan the barcode.
- To record in-house use for non-cataloged items, enter the number of uses, choose the non-cataloged type from the drop-down menu, and click Submit.
Patrons
Patron’s Reading History
The Westchester Library System does not keep a record of the items that patron’s checkout.
From Item Status, it is possible to see the last patron that circulated the item, but this information gets PERMANENTLY DELETED from the ILS 30 days after it is checked in and all fines associated with the circulation have been paid. After the 30 days, it is considered an Aged Circulation, and patron information is impossible to retrieve.
However! Patrons can opt in to record their reading history in the OPAC, and this is private to them. By turning off their reading history, the history will be permanently deleted.
Patron Registration
Before registering a patron, use Patron Search to verify that they DON’T have an existing card at a WLS library.
- Determine the patron’s home library by identification that includes proof of residence (Ex: license, lease agreement, utility bill, etc.)
- Use the Library Service Viewer Tool to help locate their home library if you’re unsure.
There are three ways to fill out the Patron Registration Form depending on which information your library likes to collect.
- Required Fields
- Suggested Fields
- All Fields

All required fields are highlighted in yellow. Evergreen is also actively checking for duplicate patrons in the system that match any of the information you’re inputting.
When registering a patron, best practice is to always:
- Verify they do NOT already have an existing account.
- They are signing up at the correct library.
- USE ALL CAPS WHEN FILLING OUT THE PATRON’S NAME.
- Input the patron’s daytime phone number. The last four digits will automatically be copied into the PIN field.
- Ask them if they prefer emailed receipts.
- Verify they have a valid email address. If they do NOT want to provide an email address, deselect it from the Notification Preferences.
- Phone numbers should be entered in a continuous numerical string. I.e., 9141234567
Complete the form (required fields are YELLOW)
- Scan or enter the barcode.
- The Password (PIN) will update automatically to the last 4 digits of the phone number when the Daytime Phone number is entered.
- Enter the first name and last name in ALL CAPS (Enter Middle Initial and Suffix if required)
- Enter Date of Birth, if required by your library
- Add Parent/Guardian information if required by your library (DOE, JANE)
- Choose a primary ID Type to show that you checked ID
- Enter an email address in all lowercase. If desired, check Email checkout receipts by default? Note: If they do NOT want to provide an email address, deselect it from the Notification Preferences.
- Enter the Daytime Phone with no spaces or dashes.
- Verify Home Library
- Choose Main (Profile) Permission Group (Privilege Expiration Date and Active checkbox will update automatically.)
- Update User Settings for hold notification.
- Enter hold notification phone number with no spaces or dashes. This assures Evergreen communicates properly with the automatic dialer.
- Enter Address. Enter the Postal Code (zip code). The city will automatically update. Change as needed.
- Enter Street (1) and optional Street (2) in all UPPER CASE
- County (if Westchester), State, and Country will update automatically
- If needed, click New Address to enter a second address
- Choose Statistical Categories if your library has contract patrons
Register a Patron: Temporary Cards
A patron registering at a library other than their “home” library should be issued a “TEMP” account. Temporary card numbers should only be issued when a potential cardholder wants to check out material at a library other than their Home Library, doesn’t already have a card, AND is eligible for a WLS card. See more information about eligibility on the WLS website.
- Check ID. Ask for mail with a street address. (Post office boxes may be necessary information for mailing purposes but aren’t sufficient as proof of residency.)
- Search for an existing record before registering the patron.
- Au pairs, nannies, teachers, students, or others should show proof of employment or school status.
- If a patron doesn’t have ID, recommend that they apply online, preferably on their home library’s website.
The TEMP card information must be sent (faxed, scanned and emailed, etc.) to the home library for the patron to gain permanent status.
Register the patron as usual except:
- Enter a temporary number. Suggested entry schemas:
- LibraryCodeTEMPDate: WLSTEMP20240924
- LibraryCodeTEMPDateNumberOfFirstTempCardThatDay: WLSTEMP202409240001
- A regular library card barcode from your library that is NOT physically given to the patron.
- Change the Library code to what should be the patron’s home library.
- Change the Profile to TEMP.
- Check out the items on the temporary card. Do not give the patron a physical card. Optional: Tell or give the patron their card number and PIN for temporary use.
- Fax or send a copy of the registration information to the home library, Attention — Circulation Desk. If unsure of the home library, call the probable library to verify.
When you receive information for a temporary card:
- Replace the temporary barcode with a new/actual barcode from your library.
- Double-check the record for accuracy.
- Change Profile from TEMP to the appropriate profile.
- Save the new information.
The patron’s home library will dictate how the patron receives their card — in the mail or in person. Best practice is to mail the permanent card to serve as another address verification and make the patron happy!
View the Evergreen Patron Essentials guide for more information on patron profiles.
Patron Records
View the Evergreen Patron essentials guide for more information on patron profiles.
Search For Patron
- Go to Search > Search for Patron or Patron Search
- Expand the search fields. Make sure search includes
- All Profile Groups
- All Libraries (WEST)
- Inactive users
- Enter the user’s last name and first initial. The names that match your search entry display.
- Click a user name to select a user. The user information will display to the left part of the screen.
- Choose an option button to Check out, see Items Out, Holds, add or pay Bills, Edit the record.

Patron Display
The stop sign alerts you to expired accounts, holds that are ready for pickup, overdue or lost items, alert messages, etc. FOLLOW UP AS NEEDED.

Patron Summary
From the patron’s account, staff can check out items to the patron, view items out (items currently checked out to the patron), patron’s holds, add or pay bills, view notes added by staff, or edit the profile as needed.
The patron’s name appears in red if the patron has any alerts. Information associated with the alert(s) also appears in red.

Navigation Buttons

- Check Out
- Items Out
- Renew
- Print Item Receipt
- Edit Due Date
- Mark Lost (by Patron), Mark Claims Returned, Mark Claims Never Checked Out
- Holds
- View
- Edit Pickup Library, Notifications, Hold dates
- Cancel, Suspend, Activate Hold
- Bills
- View, Add, Pay
- Notes
- Add/Modify/Remove an alert that will display in red in the patron summary
- Edit
- Replace Lost Card (click Replace Barcode and enter the barcode number)
- Renew card/Update Privilege (click Update Expire Date)
- Reset the PIN (Verify the daytime phone and update to match the last 4 digits. DO NOT click Generate Password). Note: The PIN field is masked and will appear to be blank.
- Update Contact Information: Name, Email (lowercase format), Phone (no spaces, no dashes), Address, Select Email checkout receipts by default if the patron wants email receipts
- Send a password reset email
- Send Test Email
- Send Test Text
- View Claims Returned and Claims Never Checked Out Counts
- Update User Settings (for hold notifications)
- Edit Statistical Categories (if your library has contract patrons)
- Other
- View Triggered Events
Fines and Bills
For libraries that charge overdue fines, Evergreen will automatically apply fees to patron accounts. Staff can still manually create and add fines to patrons’ accounts as needed.
Items checked out at a fine-free library are fine-free anywhere. They can be returned anywhere and will be fine-free. Fine-free libraries can make exceptions for materials like museum passes and hotspots, which can accrue fines, but most of these items are only locally checked out. Note: patrons will still be billed for lost items regardless of check-out library.
Items checked out at libraries that aren’t fine-free are subject to that library’s policies, even if the items are owned by a fine-free library.
If a patron doesn’t want to have fines, they must check out at a fine-free library. If they want materials owned by a library that isn’t fine-free and don’t want to have fines on them, they can place holds for pickup at a fine-free library and check them out there. (The library that’s not fine-free gets an intra-loan count instead of a circ count for those items.)
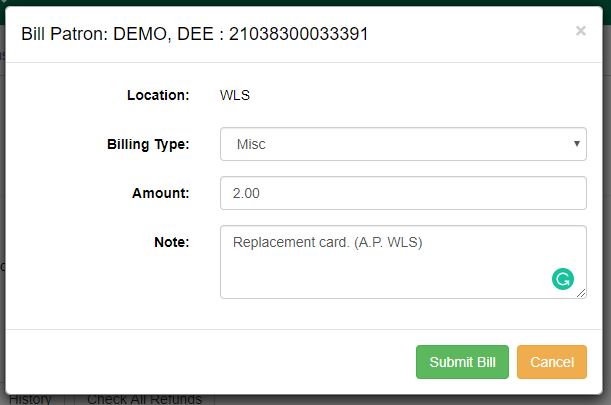
Add a Bill to a Patron’s Account
- Retrieve the patron record and open the Bills tab.
- Click the Bill Patron button in the middle of the screen.
- Use the drop-down for Billing Type to choose the bill type. (If adding a miscellaneous bill, be sure to include a brief description in the note field with your initials and3-letter library code.)
- Enter the dollar amount, including a decimal.
- Click Submit Bill.
Pay a Bill on a Patron Account
- Retrieve the patron record and open the Bills tab.
- Use the checkboxes to select the bill(s) you want to pay.
- Use the drop-down to select a Payment Type.
- In the Payment Received field, enter the dollar amount, including a decimal.
- Click Apply Payment. If full payment is made, the Bills tab will show a zero balance.
Edit a Patron’s Record
Update a PIN
From time to time, a patron may call having trouble logging into the catalog, the app, or any of our e-Resources. The most common solution to this is to rest the patron’s PIN.
From the Edit tab:
- Click Save. Once the PIN is reset, the patron can change it in their OPAC account if desired.
- Verify the Daytime Phone Number. Update as needed.
- Click in the Password/PIN field. Enter the last 4 digits of the Daytime phone.
Updating Home Library
When patron’s move to a new town or city within Westchester and want to sign up with their new home library – they do NOT need a new account! Simply update their existing profile with the new information.
Use Patron Search to locate their profile, and update the following:
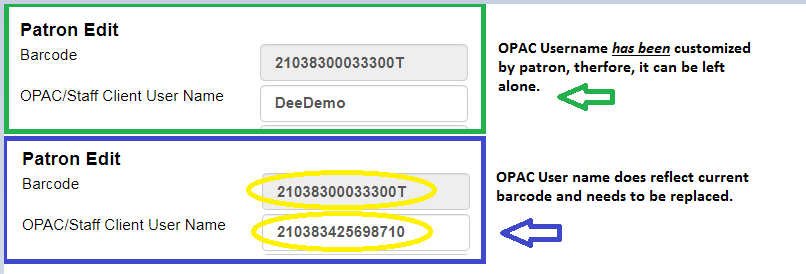
- Give them a NEW library barcode. Make sure to also update the OPAC/Username field to match.
- Update their Home Library.
- Update their Pick-up Library.
- Update their Physical/Mailing Address.
- Verify if their contact information and notification preferences are up to date.
- Remind the patron to hand over their previous card if they are updating their home library.
Note: It’s important to remember, that previous and current barcodes are permanently linked to the patron’s record. It’s impossible to delete an old barcode without deleting the patron record entirely!
Update Account Expiration Date
After proper ID has been shown, any library can update and re-authorize the information in an expired patron record. System default time for expiration is three years for most patron types.
- Retrieve the patron record.
- Go to Edit.
- Click Update Expire Date. The date will change to three years from “today.”
- Click Save.
Replace a Lost Card
Sometimes patrons lose their library cards, or they move to a different town and need their patron record updated. Each patron should have only one active card, except staff, who may have a card at their home library and a card at their work library.
From the Edit tab:
- Click Replace barcode.
- Scan a NEW library barcode.
- Make sure to also update the OPAC/Username field to match. (If you notice a customized username, leave it alone. This is what the patron uses to log into the catalog and app.)
- Remind the patron to hand over their previous card if they are updating their home library, or if they find the lost card.
As a library system, we NEVER reuse old patron barcodes because the patron’s circulation statistics are still attached to the barcode. It’s also important to remember, that previous and current barcodes are permanently linked to the patron’s record. It’s impossible to delete an old barcode without deleting the patron record entirely!
NOTE: Old/Inactive Library Cards are LINKED to the patron’s record and cannot be deleted. When searching with an inactive barcode, the current barcode will display. When an old card is scanned at Checkout, the message Patron account retrieved with INACTIVE card displays. The best practice is to verify the patron’s identity by asking for another form of ID or something similar before clicking through the alert. After you verify the patron’s identity, enter their current barcode number and proceed to checkout. Ask the patron to only carry and use the current card.
Patron Alerts and Notes
Automatic alerts appear to notify staff of overdue material or fines, materials claims returned, available holds, or if cards are about to expire.
Any comment or note manually placed on a patron’s record should be removed when it has served its purpose. When a comment is placed on a patron’s record, the following information should be included:
- Date placed
- Library’s three-letter code
- The initials of the person placing the comment
- Details regarding the comment
Add Patron Notes
Reasons for placing a note include:
- Personal property left at the library
- Instructions from a patron about use of her account
- Patron has displayed dangerous/abusive behavior towards staff.
- NEVER WRITE ANYTHING TO DISPARAGE A PATRON. ONLY WRITE THE FACTS.
To add a note:
- Click Create Note.
- Use the buttons or dropdown menu to choose a note type.
- Enter a Title and Note text.
- Click OK

Add Patron Alerts
What differentiates an Alert from a Note is visibility. Typically, this is information that is relevant to the staff that are working with this patron. Alerts display in the middle of the patron record the first time a patron is retrieved during a single session; subsequent lookups will only display the alerts in the patron summary. If the patron’s record is pulled up by another staff user, they will see the alerts in the middle of the page the first time and in the corner after that.
To add an alert:
- Click Create Alert.
- Enter a Title and Alert text. Include initials and staff code.
- Select from the Depth drop-down to choose which libraries can view this alert.
- Click OK.

Bars, Blocks, and Thresholds
Patron Blocks
Blocks are often system-generated on patron accounts. Typically, they happen when a patrons exceeds a threshold, but they can be added manually by staff. A notice appears when a staff person tries to checkout an item to blocked patrons.
System-generated blocks will still allow patrons to place holds, but whatever caused the block will need to be addressed at check-out.
To apply a block:
- Open the Notes tab within the patron’s profile.
- Select Block and add a message to explain the blocking alert.
- Be sure to include your initials and 3-letter library code.

Patron Thresholds
Depending on the Patron’s profile, thresholds can be met when a patron exceeds:
- $25.00 or more in fines.
- 35* or more holds.
- 75 or more checkouts.
When thresholds are met, a block may be applied to a card.
*PLDA voted to increase hold threshold from 25 hold requests to 35 hold requests on 4/8/25.
Barred Patrons
Have you wondered what the difference between barred and blocked is?
Barring patrons will stop them from using their library cards and alerts the staff that the patron is banned/ barred from the library. The “check-out” functionality is disabled for barred patrons (There is NO option to override – the checkout window is un-usable and the bar must be removed from the account before the patron is able to checkout items). These patrons may still log in to the OPAC to view their accounts.
Note: This is NOT the best practice and will only be used in extreme circumstances.
Barred can only be applied by certain workstations with specific permissions.
