Patrons
Video:
Sign in with your AD/Evergreen username in the format firstname.lastname@westchesterlibraries.org and password to view
Go to:
- Patron Registration
- Temporary Profiles
- Patron Profiles
- Expired Patrons
- Update/Edit Patron Accounts
- Reset Patron PIN
- Notes/Alerts/Blocks
- Merging Patrons
- Deleting Patrons
Patron Registration
- Anyone who lives, works, goes to school, or owns property in Westchester County is eligible for a library card.
- Patrons who do NOT live, work, attend school, or own property within Westchester County may obtain an Out of County card for a fee that will expire after a year through the Westchester Library System. DO NOT renew records with a profile as FEE. See also Get a Library Card on the WLS website (www.westchesterlibraries.org/Get-a-library-card) and download the form. Call 674-3600 for further info.
- There are no official age restrictions for patrons, it is simply up to the individual libraries to decide the earliest age for patrons to sign up for a card.
- Use the Library Service Area Viewer to determine the correct library location for patrons wishing to sign up for a card.
Patron Registration – In-person
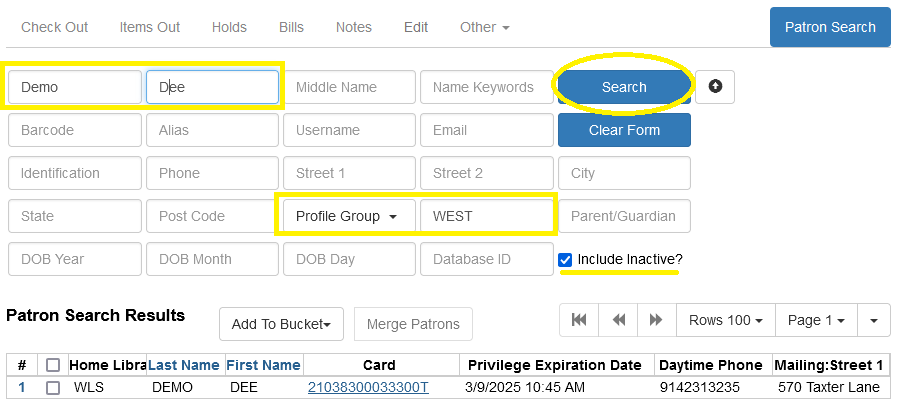
Before registering a patron, use Patron Search to verify that they don’t have an existing card at a WLS library.
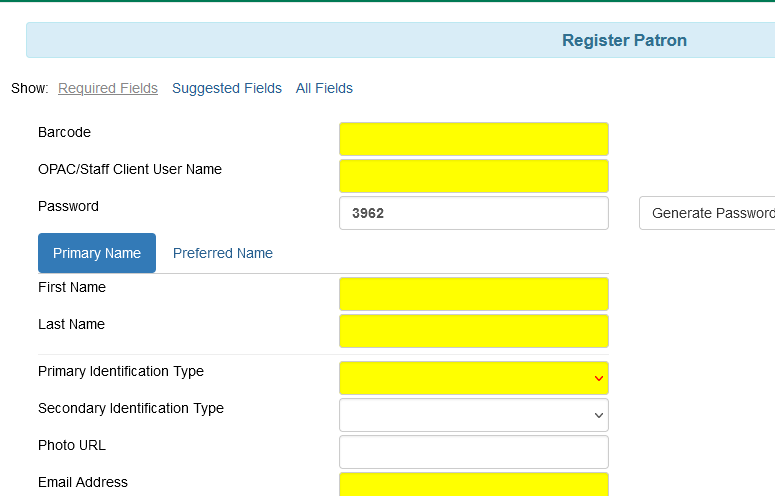
Complete the form (required fields are YELLOW)
- Enter the barcode.
- The Password (PIN) will update automatically to the last 4 digits of the phone number when the Daytime Phone number is entered.
- Enter the first name and last name in ALL CAPS (Enter Middle Initial and Suffix if required)
- Enter Date of Birth, if required by your library
- Add Parent/Guardian information if required by your library (DOE, JANE)
- Choose a primary ID Type to show that you checked ID
- Enter an email address in all lower case. If desired, check Email checkout receipts by default? (For patrons that refuse email, enter the library’s circulation email address)
- Enter the Daytime Phone with no spaces or dashes.
- Verify Home Library
- Choose Main (Profile) Permission Group (Privilege Expiration Date and Active checkbox will update automatically.)
- Update User Settings for hold notification.
- Enter hold notification phone number with 10 digits, no spaces or dashes. This assures Evergreen communicates properly with the automatic dialer.
- Enter email addresses in all lowercase.
- Enter Address. Enter the Postal Code (zip code). The city will automatically update. Change as needed.
- Enter Street (1) and optional Street (2) in all UPPER CASE
- County (if Westchester), State, and Country will update automatically
- If needed, click New Address to enter a second address
- Choose Statistical Categories if your library has contract patrons
- Enter Street (1) and optional Street (2) in all UPPER CASE
Patron Registration – Online
Patrons can request a library card online. Many libraries in the Westchester Library System have registration forms linked to their websites.
Temporary Profiles
Temporary card numbers should only be issued when a potential cardholder wants to check out material at a library other than their Home Library, doesn’t already have a card, and is eligible for a WLS card. See more information about eligibility on the WLS website.
When issuing a TEMP Card:
- Check ID. Ask for mail with a street address. Post office boxes may be necessary information for mailing purposes but aren’t sufficient as proof of residency.
- Search for an existing record before registering the patron.
- Au pairs, nannies, teachers, students, or others should show proof of employment or school status.
- If a patron doesn’t have ID, recommend that they apply online, preferably on their home library’s website.
Register the patron as usual except
- Enter a temporary number. Suggested entry schemas
- LibraryCodeDateNumberOfFirstTempCardThatDay: WNR202203030001
- LibraryCodeTEMPDateNumberOfFirstTempCardThatDay: WNRTEMP202203030001
- A regular library card from your library
- Change the Library code to the patron’s home library
- Change the Profile to TEMP
- Check out the items on the temporary card. Do not give the patron a physical card. Optional: Tell or give the patron their card number and PIN for temporary use.
- Fax or send a copy of the registration information to the home library, Attention — Circulation Desk. If unsure of the home library, call the probable library to verify.
When you receive information for a temporary card,
- Replace the barcode issued with a new barcode from home library
- Double-check the record for accuracy
- Change Profile from TEMP to appropriate profile
- Save the new information
The patron’s home library will dictate how the patron receives their card — in the mail or in person. Best practice is to mail the permanent card to serve as another address verification and make the patron happy!
Managing Pending Patrons
Note: Not every library accepts patron registrations via the pending patrons option. Check with your TechXpert or supervisor before continuing.
- In the staff client select Circulation → Pending Patrons.
- Select the patron you would like to review. In this screen, you have the option to Load the pending patron information to create a permanent library account.
- To create a permanent library account for the patron, click on the patron’s row, and click on the Load Patron button at the top of the screen. This will load the patron self-registration information into the main Patron Registration form. Verify the data entry.
**Manually update the Password field to match the last 4 digits of the Daytime Phone field.** - Enter Fill in the necessary patron information for your library, and click Save to create the permanent patron account.
Patron Profiles
Search For Patron
- Go to Search > Search for Patron or Patron Search
- Expand the search fields. Make sure search includes
- All Profile Groups
- All Libraries (WEST)
- Inactive users
- Enter the user’s last name and first initial. The names that match your search entry display.
Click a user name to select a user. The user information will display to the left part of the screen.
Choose an option button to Check out, see Items Out, Holds, add or pay Bills, Edit the record
Patron Display
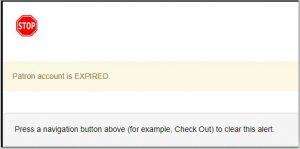
The stop sign alerts you to expired accounts, holds that are ready for pickup, overdues, lost items, alert messages, etc.
Alerts display in the middle of the patron record the first time a patron is retrieved during a single session; subsequent lookups will only display the alerts in the patron summary. If the patron’s record is pulled up by another staff user, they will see the alerts in the middle of the page the first time and in the corner after that.
FOLLOW UP AS NEEDED.
Patron Summary
- The patron’s name appears in red if the patron has alerts. Information associated with the alert(s) also appears in red.
Navigation Buttons
- Check Out
- Items Out
- Renew
- Print Item Receipt
- Edit Due Date
- Mark Lost (by Patron), Mark Claims Returned, Mark Claims Never Checked Out
- Holds
- View
- Edit Pickup Library, Notifications, Hold dates
- Cancel, Suspend, Activate Hold
- Bills
- View, Add, Pay
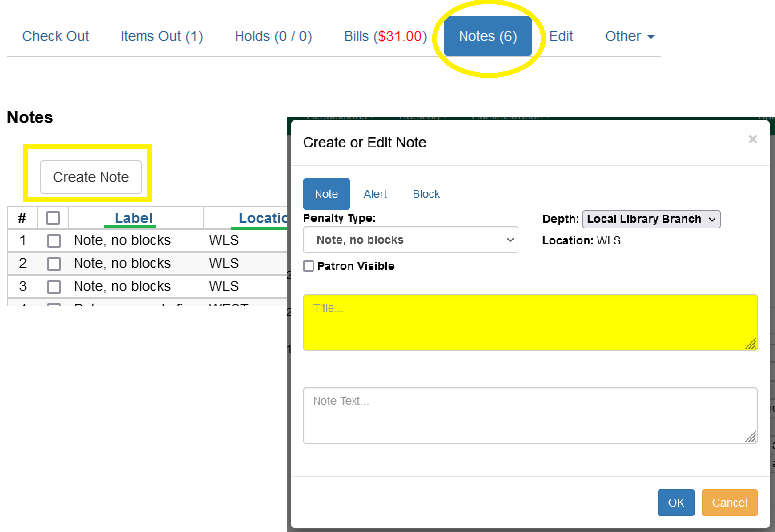
- Notes
- Add/Modify/Remove an alert that will display in red in the patron summary
- Edit
- Replace Lost Card (click Replace Barcode and enter the barcode number)
- Renew card/Update Privilege (click Update Expire Date)
- Reset the Password (PIN) Only when the patron has forgotten his PIN. Verify the daytime phone and update to match the last 4 digits. DO NOT click Generate Password
**The PIN field IS MASKED and IS NOT blank, although it appears to be blank.** - Update Contact Information: Name, Email (lowercase format), Phone (no spaces, no dashes), Address, Select Email checkout receipts by default if the patron wants email receipts
- Send a password reset email
- Send Test Email
- Send Test Text
- View Claims Returned and Claims Never Checked Out Counts
- Update User Settings (for hold notifications)
- Edit Statistical Categories (if your library has contract patrons)
- Other
- Add, edit, and delete patron notes that are for staff only or visible in the patron OPAC account
Expired Patrons
- After proper ID has been shown, any library can update and re-authorize the information in an expired patron record. The system default time for expiration is three years for most patron types.
- Expired patron records are purged from the system after 18 months past the expiration date where:
- there are no outstanding circulations, bills, or open holds (holds older than the threshold (18 and 24 months) that do not have a target copy; hopeless holds are considered not open)
- the account has not already been purged
- the account is flagged as deleted (as happens after staff use a User Bucket to delete records)
- Expired patron records with less than $25.00 in fines and no lost items are purged where
- the account has been expired 24 months or more
- there are no open circs with a stop fines cause of LOST
- bills are less than $25
- no open holds (holds older than the threshold (18 and 24 months) that do not have a target copy; hopeless holds are considered not open)
- the account has not already been purged
- Patron records with unresolved LOST issues will not be deleted.
Update/Edit Patron Accounts
Renew Card/Update Privilege
- Retrieve the patron record.
- Go to Edit.
- Click Update Expire Date. The date will change to three years from “today.”
- Click Save.
Reset Patron PIN
- Retrieve the patron record.
- Go to Edit.
- Verify the Daytime phone number. Update as needed.
- Click in the Password/PIN field. Enter the 4 digits to match the last 4 digits of the Daytime phone.
- Click Save. Once the PIN is reset, the patron can change it in their OPAC account if desired.
Pending Patron Address
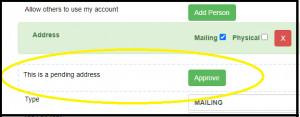
Generally, pending addresses come from allowing patrons to submit address corrections through their online accounts or are created as a result of de-linking cloned accounts.
Handling pending addresses:
- A pending address can be deleted by clicking the red X box IF another address is present.
- If there is no other address, the pending address cannot be deleted.
- If the pending address is the only address and it has an obvious error, approve it and then correct the error and save the record.
Merge Patron Cards
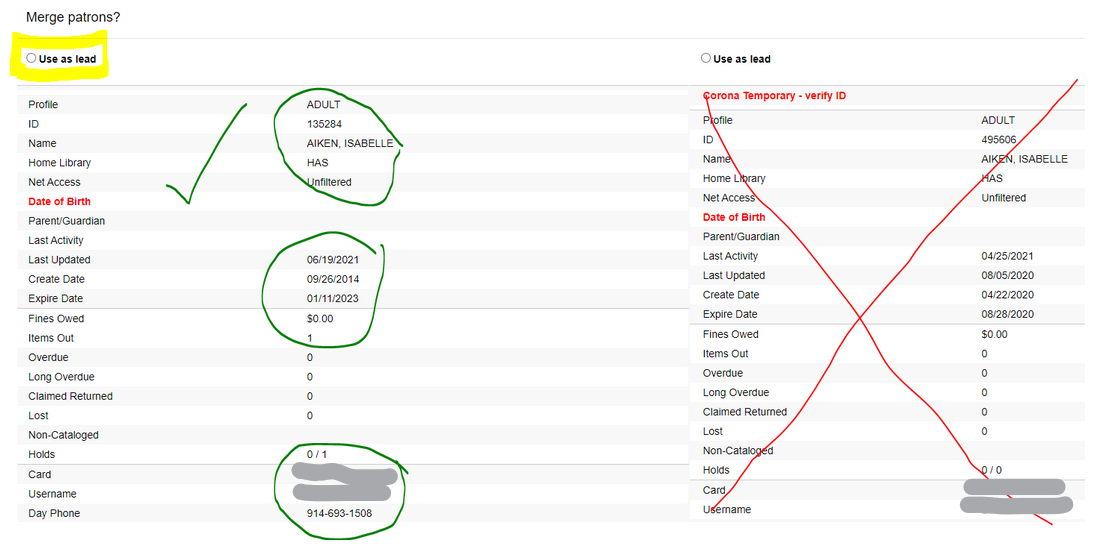
If a patron has two cards, do not delete either card. Instead, merge them.
- Go to Patron Search and search for the patron by name. Both of the accounts will display in the list.
- Select both of the accounts. Once selected, the blue Merge Patrons button will display. Click on it.
- A screen will open with both accounts displayed in two columns. Review the information for both accounts. Whichever one has the current card information, at the top of the card, click the option “Use as lead.”
- Scroll to the bottom of the screen and click on the Merge Patrons button in the bottom right corner.
- The two cards will be merged with the history of both on the new lead card.
Notes/Alerts/Blocks
Patron Notes
In Evergreen 3.8, Patron notes, Messages, Alert messages, and Standing Penalties have been folded into one Notes interface. Notes designated as “public” will display in Notes tab
- Other tab > Messages
- Patron catalog in My Account > Message Center
To add a note:
- Click Create Note
- Use the buttons or dropdown menu to choose a note type
- Enter a Title and Note text
- Click OK Note, no blocks displays only in Notes
When the alert is created by a system process – Available hold, Expired account, etc. – the whole page alert displays when the account is first opened.
When an alert is created manually, there are three options with different displays:
- Alerting Note, no blocks – adds the red note title to the patron summary, does NOT create a whole page alert
- Note, no blocks – note ONLY visible in Notes or Other > Display Alerts
- Alerting block on Circ, Hold, and Renew – adds the red note title to summary AND a whole page alert, AND also blocks the account.
Blocking Patrons
You may see a Blocked alert on a patron’s record from time to time. Often, these are system-generated blocks on patron accounts. For example, the patron exceeds the fine threshold or exceeds the max items out threshold. A notice appears when a staff person tries to checkout an item to blocked patrons, but staff may be given permissions to override blocks.
To apply a block, open the Notes tab within the patron’s profile. Select Block and add a message to explain the blocking alert. Be sure to include your initials and 3-letter library code.
Block a Patron
The best practice for making a card temporarily inactive is to apply a Message that blocks the patron.
- The card can’t be used to place holds, check out, or renew.
- The message block takes care of the message and the block all at the same time.
- The procedure is easy to view and undo.
- The patron and card remain searchable because the card is still active.
Block Vs. Bar
Have you wondered what the difference between barred and blocked is? Barring patrons will stop them from using their library cards and alerts the staff that the patron is banned/ barred from the library. The “check-out” functionality is disabled for barred patrons (NO option to override – the checkout window is unusable and the bar must be removed from the account before the patron is able to checkout items). These patrons may still log in to the OPAC to view their accounts.
Note: This is NOT the best practice and will only be used in extreme circumstances. Barred can only be applied by certain workstations with specific permissions.
Deleting Patrons
Delete Patrons
How should you handle a patron card that isn’t in use anymore, (as in when a patron moves away or is deceased)? Should the account be deleted or purged? When a patron account is deleted, the barcode won’t be usable because it won’t be found when scanned.
The best practice for a patron who is known to be deceased or who has left the WLS service area, set the expiration date to the current date and mark it inactive; resolve any outstanding issues and the account will be removed after 18 months.
Follow these steps for each patron account:
- In the patron record, go to Edit
- Set the expiration date to the current date and deselect active
- Save.
- Resolve any outstanding issues. The account will be removed after 18 months.

