
Local Administration
Evergreen Local Administration Essentials v. 4_8_2020 (printable)
The Local Administration Menu has features that are important for Supervisors and library staff who are responsible for getting new staff set up with Evergreen, as well as daily maintenance.
Configuration and Browser Set Up
Browser Setup
WLS has setup the Chrome browser as the Evergreen is the Home Page
- Pop-ups are allowed
- Cookies will not be cleared so that staff doesn’t lose
- login information, receipt and volume/copy templates
- DO NOT use incognito mode for Evergreen
- DO NOT clear cookies or browser data
- To search or work outside Evergreen so that data can be deleted,
- Use another browser (firefox is recommended) or
- Go to Customize Google> New incognito window
- Set up Gmail to open a compose window when a mail link is selected
- At the end of the address bar, click the double diamonds.
- Click Allow and Done.
History/Browsing Data
Each workstation once set up will retain its settings until changed or the browser (Chrome) history is cleared. In Chrome, a user should never select clear “Cookies and other site data.”
Staff can clear the following types of browsing data without affecting workstation settings and offline transactions:
- Browsing history
- Download history
- Cached images and files
- Passwords
- Autofill form data
- Hosted app data
- Media licenses
If the browser cookies are cleared, contact the WLS Helpdesk to help you reset the workstation. You can also:
- Import copy (item) and receipts templates using a backup file
- Re-configure column display for commonly used screens such as Check-In and Items Out.
New Hires
When libraries hire a new staff member, it is the responsibility of the Library Director or Department Supervisor to submit a helpdesk ticket to the WLS IT helpdesk notifying them and requesting that the appropriate usernames and accounts be set up for them.
Tickets should include the following information:
- First and Last Name
- Start Date
- If they will need an Active Directory Account created
- If they will need an email address created
- If they will need an Evergreen account created
- What permissions in Evergreen will they need? (I.e., Circulation, Cataloging, Acquisitions, etc.)
- Note: Not having the appropriate Evergreen permissions assigned to their account will prevent them from completing specific tasks.
Warning Messages and Permission Errors
In Evergreen, each user belongs to a group that gives them permission – or allows them – to complete tasks. Each library, through its director and/or TechXpert, lets WLS know to which group a user belongs. There are over 500 permissions used to allow work to be completed.
- A permission error occurs when the group to which a user belongs does not have the permission needed to complete a task.
- A warning message occurs when Evergreen sees that a questionable action is about to be taken so that staff confirms the action.
For a warning message, change the column display to help clarify why the action is questionable.
For example, when deleting an item, you see the popup Permission denied: COPY_DELETE_WARNING.override.
Add Copy Status to the columns display so that you can determine if the copy is
- available and allowed to be deleted or
- lost or checked out and not be eligible to be removed from the system.
With this added information, you can click OK/Continue to confirm the action or Cancel to not complete it.

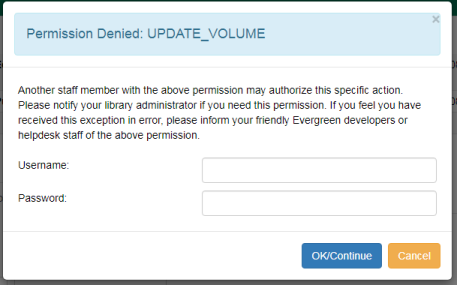
For a permission error, you will not be able to complete the task without a supervisor login.
For example, when transferring an item from one title to another, you see the popup Permission denied: UPDATE_VOLUME. If a supervisor also cannot complete the task, they should contact the help desk so that the permission can be added. Please include
- the text of the error and a description of what you were trying to do when you got it
- a screenshot of the error message you received, preferably by using the Snipping tool
Evergreen “Getting Started” Checklist
After the appropriate accounts have been created for new library staff, they’ll need to set up their Evergreen Workstation by completing the following steps:
- [ ] Sign in to Evergreen
- [ ] Register a workstation
- [ ] Set your library defaults
- [ ] Import templates; receipts, holdings, spine labels
- [ ] Customize and save your columns
Evergreen Workstation Setup
Every staff member who uses Evergreen is required to have a registered Evergreen Workstation for the location where they work.
Workstations are unique to the user in that they will retain your column customizations, default preferences and will prioritize your location in all other workflows.
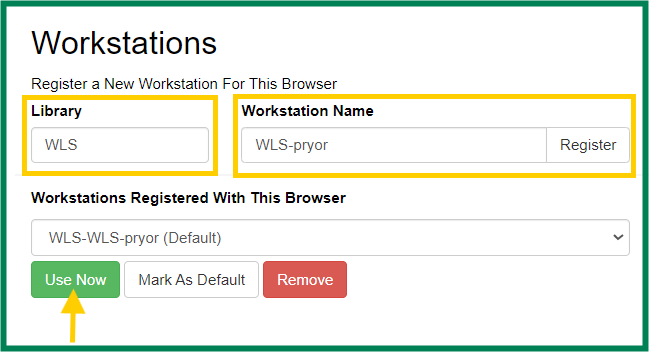
Register a Workstation
Register a workstation by opening the Administration drop-down menu > Workstation > Registered Workstations.
- Use the Library dropdown menu to choose your 3-letter library code. (Do NOT select a code that starts with S_.)
- In the Workstation Name box, repeat your 3-letter library code-your last name. I.e., BDH-smith
- If multiple staff at your library have the same last name, add letters from the first names until the workstation name is unique, I.e., for Alan Smith and Arlene Smith: BDH-smithal; BDH-smithar.
- Click Register.
- Click Use Now to continue to the Sign In screen.
- Verify that the Workstation name is registered with the browser.
- Enter your Username and Password and Sign in.
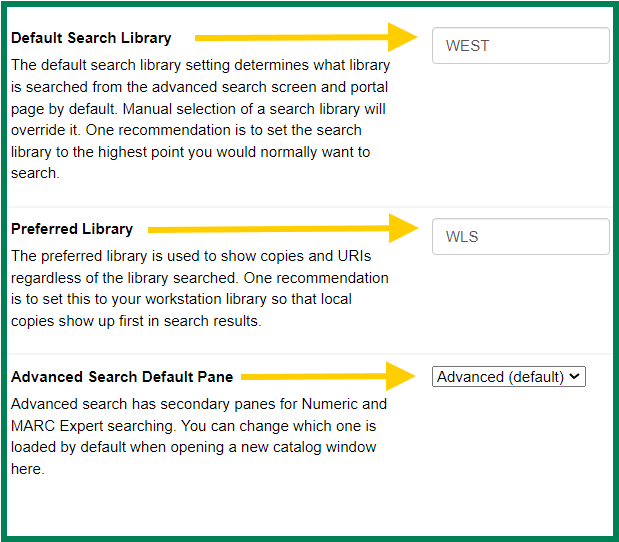
Workstation: Set Library Defaults
Go to the Administration drop-down and select Workstation.
On the right-hand side of your screen, set your defaults:
- Default Search Library: Set to WEST. Default search will show all available titles and copies in the system when searching the catalog.
- Preferred Library: Set your library 3-letter code. The Preferred library will always display your library at the top of the detailed summary screen if your library owns copies.
- Advanced Search Default Pane: Set to Advanced.
You do not need to “Save” these defaults. These settings will stay when you exit the page.
Workstations for Staff Who Work at Multiple Libraries
Staff will need to set up a workstation for each library they work at.
- At the next library, log in with the first registered workstation information.
- Go to Administration > Workstation > Registered Workstations.
- From the drop-down, choose the 3-letter code of the other library you work at/are currently in at the time of registering.
- Enter the “new” workstation name in the same format as your other workstation names, i.e. ABC-lastname.
- Choose the new name from the Workstations Registered With This Browser dropdown.
- Click Use Now.
- Sign in to the “new” workstation.
Staff must pick the right workstation for their location every time they log in.
Re-Register a Workstation
From time-to-time, you may have to re-register your workstation. This typically occurs if your Chrome profile is not synced, you update Chrome, or there was a software update for Evergreen. After signing in, if Evergreen prompts you to re-register your workstation:
- Enter the workstation name you have been using.
- An alert will display: “Workstation name already exists. Use it anyway?” Click OK/Continue.
- Continue to sign into Evergreen.
All of your defaults, columns and template will be available in your workstation.
Note: If you do not see the above alert message when re-registering your workstation, this indicates that you entered the workstation name incorrectly. Try again until you see that message. If the issue persists, contact the helpdesk.
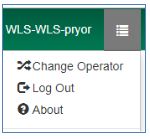
Logging Out of Your Workstation
In the top-right corner of the window, click the menu button to the right of your user name
Select Log Out
Column Configuration
From Patron Search to Item Status, Evergreen will have columns as part of the display. The default columns often display random and irrelevant information.
Because it makes the Evergreen experience easier to use and understand, customizing the columns to display relevant information is an ESSENTIAL part of the “Getting Started” process after you register a workstation.
- Check out the Column Configuration guide (linked) for easy access on choosing the right columns for each screen.
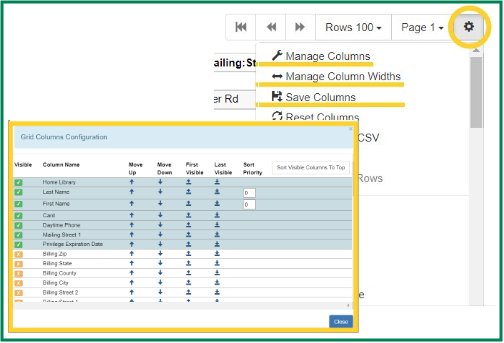
To Customize Columns
- Click the gear icon to the right of “page 1.”
- Open Manage Columns.
- Click Sort Visible Columns To Top.
- Choose columns:
- Columns with a green checkmark will display.
- Columns with an orange X are hidden.
- Sort Visible Columns to top as needed.
- Use the blue arrows to move the columns up (to the left of the list) or down (to the right) until they are in the suggested order.
- When finished, Close.
- From the dropdown, click Save Columns.
Templates
There are multiple templates available in Evergreen.
Available Templates include:
- Print Templates (receipts and any printable page within Evergreen).
- Holdings Templates (Used in Tech. Services. Allows Staff to quickly link new items to the catalog).
- Spine Label Templates (Used in Tech. Services. Allows staff to quickly print spine labels without needing to reconfigure every time.
Templates allow staff at libraries to have access to the same format and information. Templates are typically set up by one person at the library and exported to the library’s share folder. New staff are expected to import any necessary templates they may need for their duties.
Supervisors or tech staff will need to create “master copies” and export (save) them to the library share folder so that they are accessible to anyone that needs them.
Remember to have library staff re/import templates when:
- Templates have been updated.
- New hires are setting up their workstations.
- New staff computers have been acquired.
- If the web browser history/cache on a staff computer has been cleared.
Receipt and Print Templates
Default receipt templates are available in Evergreen. Receipt templates and volume/copy templates that have your library’s customizations are stored in the web browser. A department supervisor or staff person creates “master copies” and saves them to your library share.
Note: The file that is exported and imported includes all of the templates that were created on the original workstation. The export/import only needs to occur once to include all of the templates. If changes are made to any of the templates, the file should be exported again to back it up and make the updated template file available on the library share for other staff.
Go to Administration > Workstation > Print templates
- Customize all the receipts at one workstation.
- Choose a receipt template from the drop-down menu
- Edit the html to make changes to the receipt. Preview displays on the left hand side
- Click Save locally
- Repeat for other templates in the dropdown
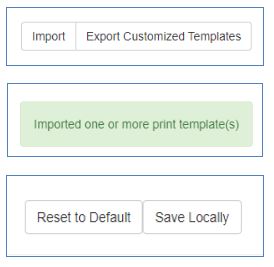
- Export Customized Templates
- Click Export Customized Receipts
- Click Open Downloads Folder.
- Right-click on the file to rename it, and then right-click on the file to copy it to your library share.
- Import Customized Templates
- Click the Import button in the top right corner of your screen. Go to your Library Share drive to access the correct folder with the saved receipt template file. Select the file and click Open.
- A note will appear in the bottom right corner of your screen stating, “Imported one or more print template(s).”
- Select Save Locally.
Optional
To view (and borrow) other libraries’ receipt codes, visit the Evergreen Receipts and Slips page on the IT wiki.
Item or Holding Templates
Item templates allow you to easily populate your item records with pre-defined fields that make the linking process more streamlined. These templates are created in the Holdings Template Editor.
- Using item templates helps to streamline cataloging and item maintenance workflows.
- Item templates are saved to the browser in which they are created and can be used by anyone who logs in to that browser.
- They can be exported for backup and imported on other workstations for consistent linking across the library.
Setting Up Item/Holdings Templates
Go to Local Administration > Local Administration> Holdings Template Editor.
- If creating a new template, add a template name in the text box.
- Edit fields as needed for shared properties:
- Circulation Library
- Status
- Shelving Location
- Reference?
- Circulation Modifier
- OPAC Visible?
- Holdable?
- Price
- Statistical Categories
- Set the Statistical Categories dropdown to WEST so that you have the same choices as all other libraries
- To match each kind of item, select
one statistical category for Monthly Reports
one statistical category for State Reports
Central Library Funds (as applicable)
- Click Save.
- Repeat Steps 1-7 for each template.
- Export to the library share Evergreen folder.
Rename the file to include the date it was exported.
The critical thing for all methods – If a value is not explicitly applied (the field turns green) – it will not be saved in the new template.
Import Templates (Add templates to your workstation)
- To import Receipt templates, go to Administration > Workstation > Print Templates.
- Open the Import button in the top right corner of your screen. Your Library Share drive will open allowing you to access the correct with the saved receipt template file. Select the file and click Open.
- A note will appear in the bottom right corner of your screen stating, “ Imported one or more print template(s).
- Select Save Locally.
- To import Holdings templates, go to Administration > Local Administration > Holdings Template Editor. Repeat steps 1 – 3.
- To import Spine Label templates, scan an item barcode into Item Status. Select the item and open the Actions drop-down menu. Repeat steps 1 – 3.
Export Templates (Share templates to your Library Share drive)
Share Item Templates
Item templates are saved to the workstation in which they were created. Item templates can be shared by exporting them to the library share folder. After they are exported, the templates can then be imported on a different workstation.
Note: The file that is exported and imported includes all of the item templates that were created on the original workstation. The export/import only needs to occur once to include all of the templates. If changes are made to any of the templates, the file should be exported again to back it up and make the updated template file available on the library share for other staff.
Export Templates
Click Export in the Item Templates interface. Your computer will prompt you to save the file. Choose a name for the file and save it to the library share folder. Note: This action will export all of your item templates.
Cash Reports
Cash reports are useful for quickly getting information about money that your library has collected from patrons. This can be helpful in a few different scenarios, such as:
- Reconciling a cash drawer at the end of the day.
- Seeing how popular a specific payment type is (perhaps when evaluating a food-for-fines program).
To use the cash reports,
- Under the Administration menu, choose Local Administration.
- Click Cash reports.
- Select the time period and library you are interested in. (This interface defaults to showing payments accepted during the current day.)
- Click Submit.
Note: If a staff member works at two different locations, the home library on their account seems to display on that library’s cash report even though the staff is at another location.
Transit Lists
The transit list is used to track items that have been in the delivery longer than expected; the process includes canceling transits, marking items missing, and retargeting holds. The best practice is to check the list monthly.
- Go to Administration → Local Administration → Transit List. Your library will already be selected. First process the Transits To list, and then process the Transits From list.
- Sort the list by column header
- Shelving Location to check shelves
- Send Date/Time column header to sort the list by the oldest transit date to the newest.
- Barcode column header if you would like to sort your library’s items first.
- To print the Transit List, use the drop-down menu to the right of the page sorter and choose Print Full Grid.
- Check your shelves for any items on the list.
For Your Library’s Items
- If found, select the items and choose Cancel Transit to change the transit status. This action prevents the patron holds from lingering indefinitely.
- A confirmation pop-up displays that indicates if there are holds associated with the transit and will re-target those holds.
- Click Cancel Transit. The transits disappear from the list, and the copy status changes to “Canceled Transit.”
- If not found, cancel the transits as above and then add the items to a bucket.
- Go to Cataloging > Item Buckets. Choose your bucket and edit the status of the items to Missing. Note: permissions may be needed to change the item status.
For Another Library’s Items
- If the item is found and meant to fill a hold at your library, go to the patron record to verify the hold.
- Check the item in to change the hold status for Ready For Pickup.
- If the item is not found and wad meant to fill a hold at your library, open the title link in a new tab.
- On the View Holds tab, select the item and go to Actions>Find a new target. This will prompt the system to look again for another copy.
Library Hours of Operation
The days of the week and the hourly schedule that your library is open can only be configured by WLS. If any changes need to be made to your library’s Hours of Operation, such as seasonal hours going into effect, or your library is closed every Sunday, please send a help desk ticket to WLS IT so that they can be updated ASAP.
Closed Dates Editor
Not to be confused with Library Hours, where Evergreen sets your library’s regular hours for the days of the week, the Closed Dates Editor is used to set your library as closed for the day for events such as holidays, bad weather days, or emergency closures. When setting the Closed Dates, Evergreen automatically adjusts due dates, hold dates, and fines.
- Due dates. Due dates that would fall on closed days are automatically pushed forward to the next open day. Likewise, if an item is checked out at 8pm, for example, and would normally be due on a day when the library closes before 8pm, Evergreen pushes the due date forward to the next open day.
- Overdue fines. Overdue fines may not be charged on days when the library is closed. This fine behavior depends on how the Charge fines on overdue circulations when closed setting is configured in the Library Settings Editor.
To add a scheduled closed date,
- Go to Administration → Local Administration → Closed Dates Editor
- Click Add closing.
- For a single closed date, choose Closing Type Closed One Full Day and select that date from the calendar.
- For multiple days, choose Closing Type Multiple Days and select a Start and End Date.
- Enter a reason (optional)
- Click OK.
To delete a scheduled closed date,
- Go to Administration → Local Administration → Closed Dates Editor
- Select the row with the date that you want to remove.
- Right click, and click Delete closing.
Emergency Closings
The Emergency Closings feature can be used as part of the Closed Dates Editor. The Closed Dates Editor includes an Emergency Closing feature that allows libraries to shift due dates and expiry dates to the next open day. Overdue fines will be automatically voided for the day(s) the library is marked closed. Once an Emergency Closing is processed, it is permanent and cannot be rolled back.
Setting emergency closed dates will:
- Void overdue fines incurred for the emergency closed dates
- Push item due dates to the next open day as determined by your library’s open hours
- Push back hold shelf expire times (the date after which a ready for pickup should be cleared from the hold shelf) to the next open day as determined by your library’s open hours.
- During a closure, Evergreen does not capture your items for holds; they will not display on your Pull Holds List.
- Go to Administration → Local Administration → Closed Dates Editor
- For a single closed date, choose Closing Type Closed One Full Day and select that date from the calendar.
- For multiple days, choose Closing Type Multiple Days and select a Start and End Date.
- When a date is chosen that is nearer in time than the end of the longest configured circulation period, a Possible Emergency Closing message displays in the pop-up and in the bottom right-hand corner of the screen.
- Below the Possible Emergency Closing message, two check boxes appear: Emergency and Process Immediately.
- Manually select the Emergency and Process Immediately check boxes to confirm the closing as an Emergency Closing.
- Click OK.
An animated “working on it” bar will display while Evergreen processes open transactions. The number of open transactions determines how long the process takes.
If the original closure period needs to be extended
If the original closure period needs to be extended, add a new closing and proceed as above for an Emergency Closing. This ensures that all due dates that fall after the original emergency closure end are updated. Do not edit the original emergency closed dates entry.
If the original closure period needs to be shortened
If the original closure period needs to be shortened, leave the existing entry as is until the library opens, and then delete the closed date. Existing due dates and hold shelf dates will keep their extended dates and deleting the closed date will allow new circ due dates to be calculated normally.
To restart circulation and hold processes during a time of limited service
To restart circulation and hold processes during a time of limited service, delete the latest emergency closed date if you want to:
- Keep existing due date and hold shelf expiration dates
- Resume normal loan durations and shelf expire times for new circulations and holds made available
- Send out materials to other libraries to fill holds