
Evergreen Reports
Printable Presentation Slides With Step-by-Steps
- Evergreen Report Essentials 9-13-2023
- Evergreen Reports – Modifying Templates 06-26-2024
- Evergreen Reports For Collection Development 8-22-2024
- Evergreen Reports For Weeding and Collection Maintenance 10-11-2023
- Evergreen Reports – Recurring Reports Training Slides 3-22-2022
View the Evergreen3-14_ReporterUpdate_Slides for current screen shots.
- Evergreen 3.14 Reporter Overview – 2025-05-23 presentation Recording
- Sign in with your AD/Evergreen username and password, with the username format firstname.lastname@westchesterlibraries.org
Training Videos
Sign in with your AD/Evergreen username in the format firstname.lastname@westchesterlibraries.org and password to view
- Evergreen Report Essentials Training Session 1-9-2024
- Evergreen Reports For Collection Development Session 8-22-2024
- Evergreen Reports – Modifying Templates Training Session 06-26-2024
- Evergreen Reports For Weeding and Collection Maintenance 10-11-2023
- Evergreen Purchase Alert Reports Training Session
Shared reports documentation
Click here for a list of shared templates, with information about the template construction and usage guidelines. [In progress]
Report how-tos
There are 4 workflows to running reports successfully
- Set up My Folders subfolders
- Clone report templates to your subfolders
- Set up and run a report
- Retrieve an output. These may be
Set up Subfolders
It’s important to set up folders prior to cloning or running reports. Folders are used in the Reports module to organize reports. On the main Reports screen there are two sets of folders:
- My Folders where you will store templates, reports that you create and run using your login
- Shared Folders where you will find report templates or output that have been shared with you by another staff user at your library, library system, or consortium.
Evergreen Reports are made up of three components that are stored in three main folders: Templates, Reports (definitions), and Output. Create corresponding subfolders within each of these main folders to store and organize these components for easier use and location. For example, create a subfolder called Circulation in the Templates folder AND in the Reports folder AND in the Output folder.
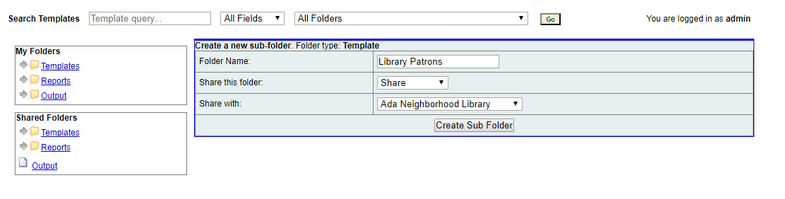
Creating Report Subfolders
- In My Folders, click on the Template folder.
- Enter a Folder Name. For example, “Circulation.”
- Click Create Sub Folder.
- Click on the Reports folder. Repeat 2 – 3. (The subfolder name will carry over from the Templates subfolder that you just created.)
- Click on the Output folder. Repeat 2-3.

- To create additional subfolders, click on the main folder name again and repeat steps 2-5.
After you create subfolders, click on the grey arrow located next to the main folder name to access the list of subfolders.
Sharing an existing Template folder
(Optional) Subfolders can be shared with library branch or local system.
- Select a subfolder and Manage Folder.
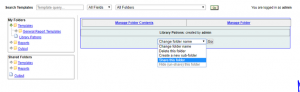
- From the “Share this folder” drop down menu, select Share.
- From the “Share with” drop down menu, select your library branch (eg. MTP) or local system (eg. S_MTP).
- Click Share.

NOTE: If you use nested folders, e.g. the “Circulation” folders has various subfolders, share the top level folder and all of the nested folders. There is a known issue where Evergreen doesn’t know how to share a folder that has an unshared parent, which breaks the folder menu.
To change a folder share
- Click on the folder name and select Manage Folder in the upper right portion of the screen.
- Select Hide (un-share) this folder from the drop down menu, and click Go.
- Then use the steps above to share the folder at the desired level.
Clone a Report Template in Evergreen
You must clone a template from a shared folder to your own folders for future use. This allows each user to manage their report templates locally. Templates may be cloned and run “as is” or they may be modified during the cloning process.
- Locate the shared report template that you want to clone by searching for a template (searching only the name field is often helpful) or browsing
- Under Shared Folders, go to Templates>
- evergreen.reports
- allisonmidgley>WLS Shared Report Templates (WEST)
- Click on the grey arrow to view the subfolders
- Click on a folder to view the templates that it contains.
- Under Shared Folders, go to Templates>
- When you see the template that you would like to clone,
- Click the check box next to the report.
- From the dropdown menu at the top of the screen, choose Clone selected template
- Click Submit. Your My Folders>Templates>subfolders display.
- From your folder list, select the folder in which you want to save the cloned template. The report template builder displays. This is where you could make changes to the template.
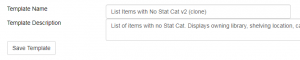
- Change the Template Name, eg. add your initials or a version number.
**Evergreen Pro Tip! Because templates are usually used for multiple purposes, keep the original template name and add only your initials – or copy the original template name into the description so that if you have questions later, you and WLS staff can track back issues and answer questions.** - Click Save Template. The template is now stored in your local subfolder. Proceed with the Set Up and Run a Report instructions.

Modifying a template
If you need to make changes to a template – for example, to add or remove display fields, or change filters – follow the steps above through Step 5. Change the name of the template to reflect the changes made to the original template. To help future troubleshooting, you can also update the description to include the original template name.
Set Up and Run a Report
There are two ways to run reports.
- Use your cloned report template to create a Report definition and output.
- Set up and run a report from an existing output. (To retrieve output for reports that are set up to auto-run, such as the Purchase Alert reports, see below.)
Run from a template
-
- In My Folders, click the grey arrow by Templates to see the subfolders. Open the subfolder that contains the report template you need and click it to view templates.
OR
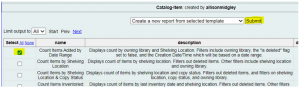
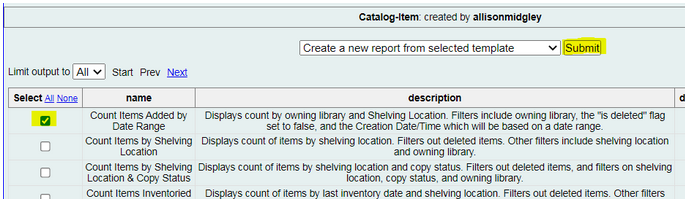
Use the search at the top of the page to find matching templates. A template list loads. - In the template list, click the check box next to the report template that you would like to run.
- From the dropdown menu at the top of the screen, choose Create a new report from the selected template, and click Submit.
The report definition screen displays with the Template Name, Template Creator, and a Template Description for the report template. - Assign a Report Name. Hint: copy the Template Name into the Report Name field and customize.
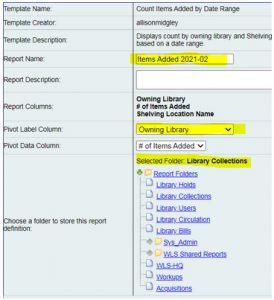 Enter a Report Description (Optional). Hint: copy the template description into the Report Description field and customize.
- Choose Pivot Label Column and Pivot Data Column (optional). Your choice becomes the columns in your report to make it easier to read and sets display preferences for a bar chart.
- Select a subfolder to store the report definition.
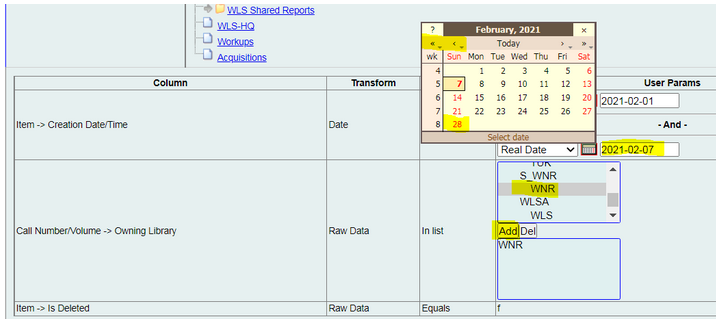
- Select the User Param[eters] to filter the report. There may be Field Hints that provide more information.
— Dates Use the calendar to choose a date
< moves 1 month. << moves 1 year
OR enter a date in YYYY-MM-DD format
— Lists Select one or more options and click Add
Ctrl-select to select multiples. Ctrl-A to select all
— Call Numbers Note the operator (between, contains, etc) to enter call number information

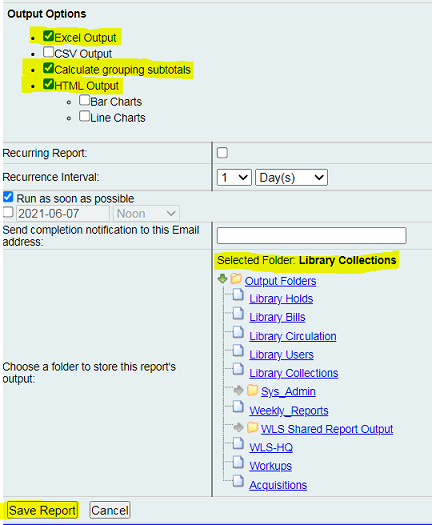
- Choose output options by using the check boxes

- Excel Output for full report
- HTML Output for a preview
- Calculate grouping subtotals to add subtotals and grand totals in count reports
- Bar Charts are okay for small data sets. Deselect for lists.
- Choose when to Run [the report]
- In My Folders, click the grey arrow by Templates to see the subfolders. Open the subfolder that contains the report template you need and click it to view templates.

-
-
- To test a report, or for a one off, choose as soon as possible.
After you know that your report tells you what you want to know, you can set up recurrence to run a report weekly, monthly, etc. - (optional) Enter an email address to be notified when large or recurring reports finish.
- To test a report, or for a one off, choose as soon as possible.
-
-
- Click an Output subfolder to store the report output.
- Click Save Report.
Run a report from an existing output
- Go to the output that you want to replicate.
- Click on the name of the output. A pink bar will open with more information.
- On the right-hand side, click Edit. The report definition screen will open.
- Enter a new name and edit the existing filters to make a variation of the existing report.
- Verify or edit folder locations.
- Save as new to create a new report.
Retrieve Your Output
Download and save outputs to local storage (your Documents or library share drive) for long-term access. Outputs and report definitions are purged from the Evergreen server after 18 months.
- Go to the Output subfolder where you chose to store the results.
- When your report appears in Completed Items, check the box next to it, select View report output, and click Submit. The output window displays.
- If you chose a bar chart, it displays.
- Click Tabular Output to preview results or see small result sets.
- Click Excel Output to download the full report.
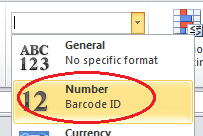
In Excel output, barcode IDs must be reformatted to display as 14-digit numbers (LibreOffice formats barcode IDs as numbers so no reformatting is needed).
- Select the barcode column
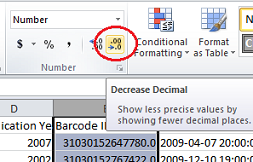
- In the Numbers format dropdown, choose Number. Numbers will display with decimals
- Use the decrease decimal button to remove the decimals.
To retrieve output for reports that are set up to auto-run, such as the Purchase Alert reports,
- Go to a subfolder under Output. This is usually in
Shared Reports>Output>sharer.name>category subfolder> name of report - In Completed Items, check the box next to the output.
- At the top of the green window, from the dropdown menu, select View report output
- Click Submit. The output window displays.
- Click Tabular output to preview results or see small result sets.
- Click Excel Output to download the full report.
Uploading Multiple Barcodes For Batch Changes
You can upload multiple barcodes to Evergreen to make batch changes. Always add the Item Status column to the display so that you can verify that items are in locations that are appropriate for editing or deleting before taking any action on them.
From a report output:
- Open the output in Excel. Reformat the barcode IDs, filter, sort, and analyze the data as needed.
- Select up to 100 barcode IDs and copy
- Open a Notepad file. Paste the barcodes into it and save it. It will be a .txt file.
- Go to Circulation > Scan Item
- Click Choose file, browse to the file, and open it. The items will load for batch changes.
Recurring Reports
Once a report is set up that provides reliable output, you can schedule a report to run on a regular basis, such as a monthly patron list or lost item report. You’ll get an email informing you that the report has successfully run.
To add a recurring report
- Use the Evergreen Reports Essentials steps for Running a Report with the changes described below.
- In the date filter, use the dropdown menu to change Real Date to Relative date. This will keep the interval in the filter, but update it for the dates preceding your run date.

- In the Output Options, select the Recurring Report check-box and set the recurrence interval

- Choose a numerical frequency
- Choose the type of interval.
For instance, for annual reports, choose 12 Months
- Deselect Run as soon as possible.
- Check the box in the next line and enter the next date in YYYY-MM-DD format when you want the report to run.

- In the next box, enter an email address to receive completion emails.
- Select a folder for the report’s output.
- Click Save as New. An Action Succeeded dialog box displays.
- Click OK.
You will get an email when the report runs. Go to Evergreen Reports to retrieve the output.
- In Chrome, logged into Evergreen, open a new tab.
- Paste the URL into the address bar.
- If needed, enter your Evergreen login to see the results. If the page doesn’t load, go to the Evergreen Reports module and access the output in Output folder.
To stop or make changes to an existing recurring report
Sometimes you may wish to stop or make changes to a recurring report, e.g. the recurrence interval, generation date, email address to receive completion email, output format/folder or even filter values (such as the number of days overdue).
- Use the existing report and the steps above to set up a new recurring report with the desired changes.
- Make sure that you have local report outputs.** Deleting a report also deletes all output associated with it.**
- Delete the current report from the report folder.
**Need to change your notification email in a scheduled recurring report?**
- Go to the output
- In the pending report, edit the report’s notification email (see run a report from a report output that you already ran).
- Save and then Apply Changes