
Evergreen Hold Essentials
Evergreen Holds Process Presentation 2022-03-03
Evergreen Holds and Baskets v. 5.25.2022 (printable)
Video
Sign in with your AD/Evergreen username in the format firstname.lastname@westchesterlibraries.org and password to view
Evergreen Hold Essentials
- Hold Types
- The Place Hold Form
- Placing Multiple Holds
- Hold Statuses
- How are the Holds Getting Filled?
- Retargeting Holds
- Hold Maintenance
- Holds Pull List
- Capturing Holds
- Clearing Shelf-Expired Holds
- Edit Holds
- Hopeless Holds
(PLDA voted to increase hold threshold from 25 hold requests to 35 hold requests on 4/8/25.)
Hold Types
Evergreen has different levels of holds. Library staff can place holds at all levels, while patrons can only place title-level holds, and meta-record holds.
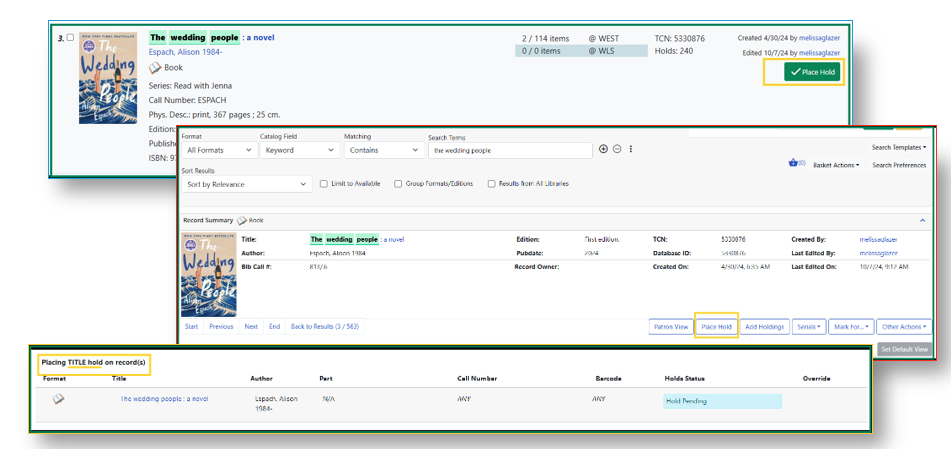
Title Holds
Title holds can be placed by Patrons and Staff. This is usually the quickest way for holds to get filled, as Evergreen is looking to find any available copy that is linked to the specific title record.
To place a Title-level hold,
- Search for the title in the catalog and click the Place Hold link from the Search Results list, or click the Place Hold link found in the Title Record Summary screen.
- Scan or type patron’s barcode into the barcode field.
- If this title contains multiple parts, you can specify which part to request. If you do not select a part, the hold will target any of the other copies on this record, that is, those with no parts attached. Those copies are usually the complete set, containing all the parts.
- Edit patron hold notification and expiration date fields as required. Be sure to choose a valid Pickup location.
- Click Submit.
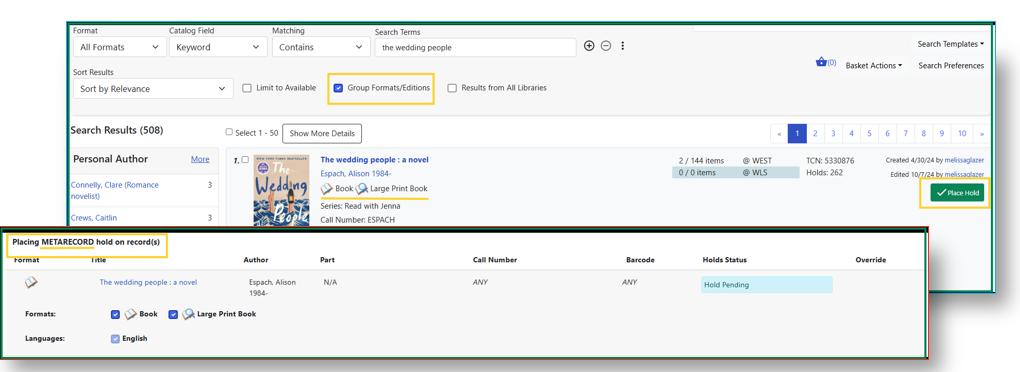
Meta-Record Holds
Meta-Record holds can also be placed by Patrons and Staff. This is also one of the quickest way for holds to get filled, as Evergreen is looking to find any available copy-format (book, audio-book, large print, available in other languages) that is linked to the title.
To place a Meta-record Hold,
- Patrons and staff will first need to turn on Group Formats/Editions when they are searching.
- Clicking on the Place Hold button from the search results page will then take them to the Place Hold Form where they have the option to deselect formats or languages they do not want.
- Fill out the hold form, making sure to verify patron preferences.
- Click Submit.
Selecting multiple formats will not place all of these formats on hold, but rather the first available copy in any of those selected formats or languages.
Item Holds
Item Holds can only be placed by staff. These types of holds can take longer to fill because staff are placing holds on specific items (Remember! Items also refer to copies, holdings, or barcodes).
- From the Item Table, find the copy you would like.
- Select the Item Hold link.
- Fill out the hold form, making sure to verify patron preferences.
- Click Submit.

Call Number Holds
Call Number Holds can also only be placed by staff. These types of holds can also take longer to fill because staff are placing holds on specific items that share the same call number, owned by the same library.
- From the Item Table, find the call number records you would like.
- Select the Call Number Hold link.
- Fill out the hold form, making sure to verify patron preferences.
- Click Submit.

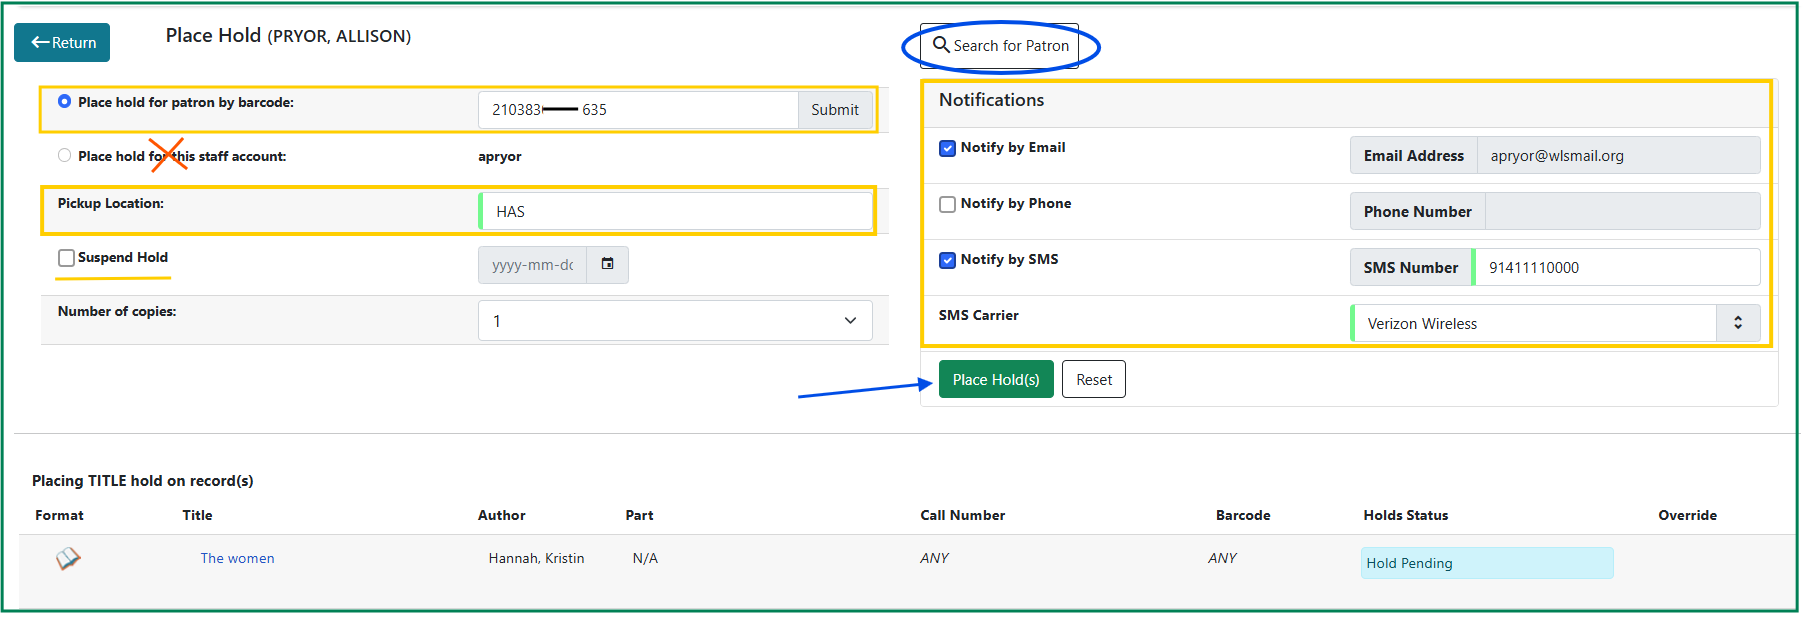
The Place Hold Form
- Scan the patron’s barcode or use the Patron Search button to retrieve their barcode if they don’t have it handy.
Important!: DO NOT USE “Place hold for this staff account.” It is associated with your Evergreen workstation username account and will not work. - Verify the patron’s preferred pickup location. The pickup location will be defaulted to the workstation location.
- To suspend the hold, click the Suspend hold checkbox and use the calendar to create an Activation Date.
- Verify the Notification methods. Notifications will follow the patron’s default preferences pulled directly from their account. Multiple notification methods are available.
- Note: Phone numbers must be entered WITHOUT spaces or dashes. Email addresses must be in lowercase format.
- Patron’s can choose alternative notification methods, but it will only be applied to this singular hold.
- Click Place hold.
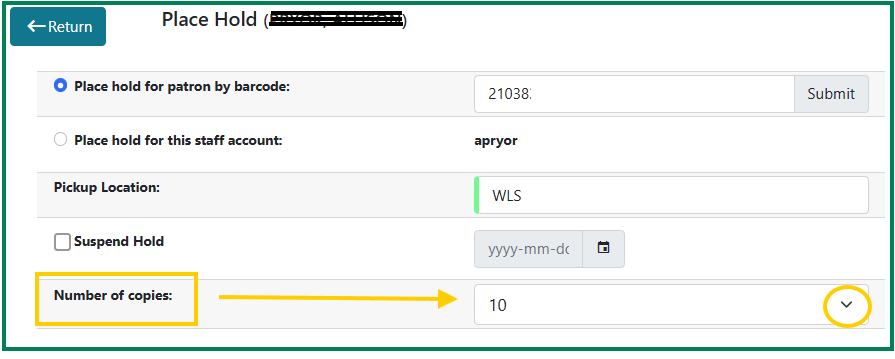
< id=”placing_multiple_holds”>Placing Holds on Multiple Copies of the Same Title
Another staff-specific feature is that library staff can place multiple copies on hold for events like book clubs or Battle of the Books!
This can only be done with Title-record or Meta-record holds.
- Underneath the Suspend Hold option is the Number of Copies dropdown menu. Staff can select up to 25 copies.
- Note: You may need to force an override, as you may reach your hold thresh-hold if you have others holds on the card you’re using.
Placing Multiple Holds Using a Basket
This functionality is only available to staff. Adding titles to a basket will allow you to place holds on multiple titles at once.
From Search Results,
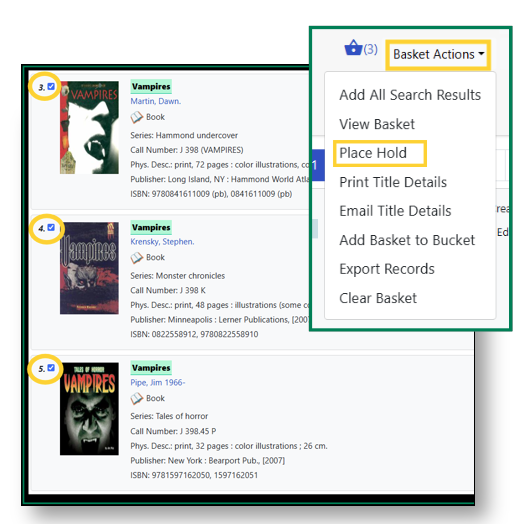
- For each desired title in a results list, click the box next to the cover art to select it. This will add it to your basket.
(In the Basket Actions drop down menu, Add All Search Results will add all of the results in a search results list or a single title if you are on the Title Record page.) - From the Basket Actions dropdown, choose Place Holds. The Place Hold Form will open, listing all titles.
Follow steps 1 – 5 above.
“Clear basket” will remove items after holds are placed. This prevents duplicate holds.
Note: From the title record detail display, use the Add All Titles option in the Basket dropdown.
Other basket actions
- View basket allows those items to be filtered
- Print Titles
- Email Titles
- Add basket to bucket allows title (bibliographic) records to be modified, deleted
Hold Statuses
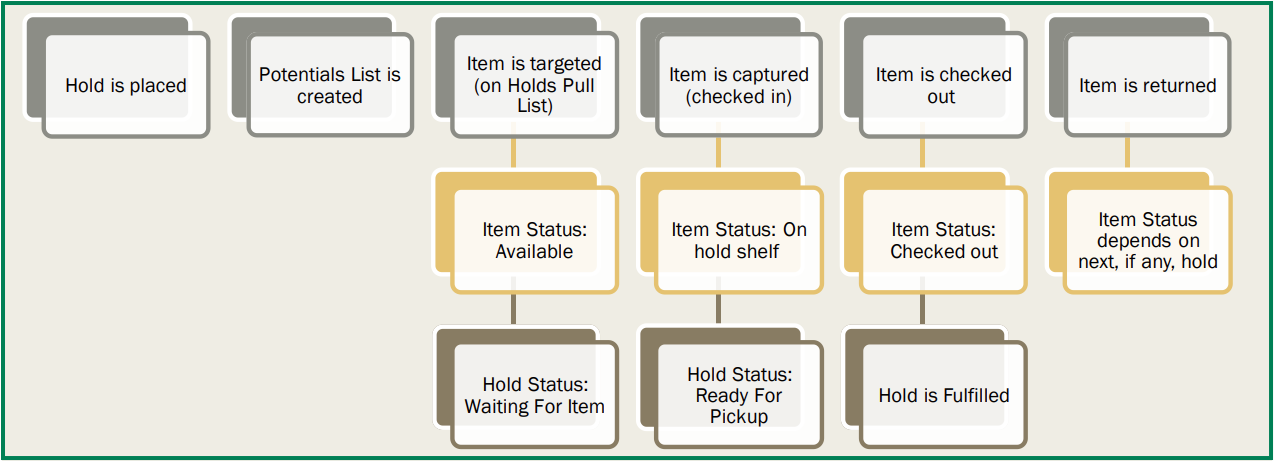
There are usually four statuses a hold may have: Waiting for Copy, Waiting for Capture, In Transit and Ready for Pickup.
- Waiting-for-copy: all holdable copies are checked out or not available.
- Waiting-for-capture: an available copy is assigned to the hold. The item shows up on the Holds Pull List waiting for staff to search the shelf and capture the hold.
- In Transit: holds are captured at a non-pickup branch and on the way to the pick-up location.
- Ready-for-pick-up: holds are captured and items are on the Hold Shelf waiting for patrons to pick up. Besides capturing holds when checking in items, Evergreen matches holds with available items in your library at regular intervals. Once a matching copy is found, the item’s barcode number is assigned to the hold and the item is put on the Holds Pull List. Staff can print the Holds Pull List and search for the items on shelves.
How are the Holds Getting Filled?
Potentials List
When a hold is placed in Evergreen, the system creates a list of potential items that could fill the hold. Evergreen checks those items for anything
that should prevent them from filling a hold such as
• Holdable flag in the item record
• Hold policy restrictions
• Patron restrictions
Eligible Items
From the potentials list, Evergreen creates a list of items that are eligible to fill the hold. Two processes are started simultaneously to
fill the hold:
1. Targeting, which looks for an available item to fill the hold. This can include:
- Evergreen eligible items that are in the statuses Available or Reshelving
- A single item is targeted to fill the hold and
put on the owning library’s Holds Pull List - If the targeted item fills the hold before it is
filled by opportunistic capture, the hold will
be filled by the targeted item. - Holds are retargeted every 24 hours after the
hold was placed based on the hold request
creation timestamp.
2. Opportunistic Capture, which looks at items being checked in to fill the hold.
- Evergreen looks for an item to be checked in at the hold Pickup Library.
- When an eligible item is checked in at the Pickup Library, that item will fill the hold, as long as the targeted item has not already
been captured.
Newly Added Items
Holds are retargeted every 24 hours after a hold was placed based on the hold request creation timestamp.
- It is the time of day the hold was placed which influences the time of day the hold request is refreshed to identify available items.
- An item that is added and made available in the afternoon may fill a hold that was placed in the afternoon (based on time) instead of a hold that
was placed in the morning (based on date).
Local Hold Process:
Hold Pickup Location and Item Location Match (the item is at the pickup library).
Remote Hold Process:
Hold Pickup Location and Item Location Don’t Match (the item is filling a hold at another library).

Retargeting Holds
When new items are added/linked to the catalog, or after some types of item status changes, for instance when an item is changed from On Order to In Process – they need to be retargeted. This is because Evergreen does not automatically recognize the newly added items as available to fill holds. Retargeting these items will tell Evergreen to start looking at them to fill new or existing hold requests.
For new items that were just added/linked to the catalog:
- From the Circulation drop-down menu, open Checkin.
- In the bottom right corner of the screen, open the Checkin Modifiers dropdown menu.
- Select Retarget Local Holds AND Retarget All Statuses.
- Scan your items.
Note: You can also use this work flows for when you know for a fact your copies are not filling holds!
For titles that have a lot of holds, but aren’t being targeted, or filling as expected:
- From the Title Record, open the View Holds tab.
- Sort the holds by clicking on the Status column header and then select all the holds that have a Waiting For Copy status.
- Open the Actions menu, and select Find Another Target.
- A window will open asking if you are sure you would like to reset the holds for these items. Click Yes. (Nothing may appear to happen, or if you are retargeting a lot of holds at once, your screen may go blank or seem to freeze for a moment while the holds are retargeted.)
- When the screen refreshes, the holds will be retargeted. The system will now recognize the new items as available for holds.
Hold Maintenance
Holds Pull List
The Holds Pull List is updated constantly. Once an item on the list is no longer available or a hold on the list is captured, the items will disappear from the list. The Holds Pull List should be printed at least once a day. Typically, libraries will print first thing in the morning and an hour or two before they close.
To retrieve your Holds Pull List,
- Open the Circulation dropdown menu and click the Pull List for Hold Requests link.
- The Holds Pull List will be displayed. You can re-sort the display by clicking the column headers. You can also add fields to the display by using the column picker. (Column adjustments will only affect the screen display and the CSV download for the holds pull list. It will not affect the printable holds pull list.)
- Print your list using any of the options below.
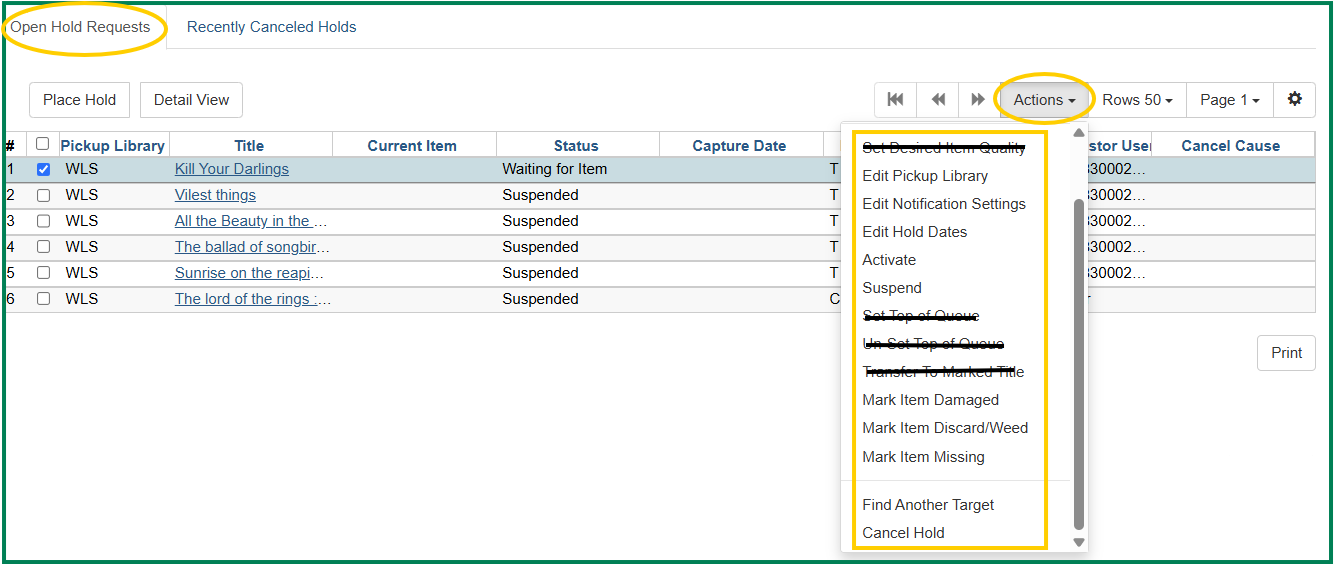
- Additionally, library staff can also use the Actions menu to edit items on the Holds Pull List, such as Cancel Hold, Find Another Target, Mark Item as Damaged, Mark Item as Discard/Weed, or Mark Item as Missing if necessary.
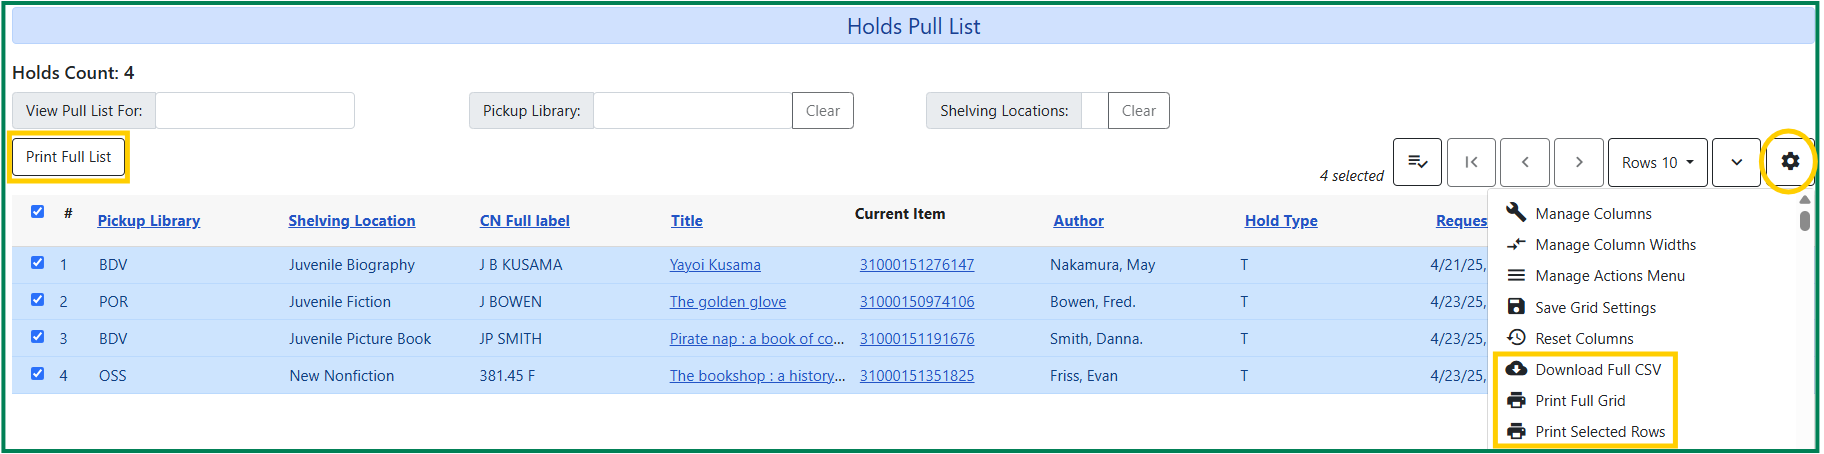
Printing the Holds Pull List
The following options are available for printing the pull list:
- Print Full Pull List button: Prints Title, Author, Shelving Location, Call Number and Item Barcode. This method uses less paper than the alternate strategy.
- Download CSV: This option is available from the List Actions button (gear icon) and saves all fields in the screen display to a CSV file. This file can then be opened in Excel or another spreadsheet program. This option provides more flexibility in identifying fields that should be printed.
- Print Full Grid: This option is available from the List Actions button (gear icon) and will print the entire Holds Pull List, including every coumn displayed as well as gridlines.
Capturing Holds
Holds can be captured when a checked-out item is returned (checked in) or an item on the Holds Pull List is retrieved and captured. When a hold is captured, the hold slip will be printed and if the patron has chosen to be notified by email, the email notification will be sent out. The item should be put on the hold shelf.
- To capture a hold, select Circulation → Capture Holds (or press Shift-F2).
- Scan or type barcode and click Submit.
- The following hold slip is automatically printed. If your workstation is not setup for silent printing (via Hatch), then a print window will appear.
- If the item should be sent to another location, a hold transit slip will be printed. If your workstation is not setup for silent printing (via Hatch), then another print window will appear.
NOTE: A captured hold with a status of On Hold Shelf can be cancelled by either staff or patrons. But the status of the item will not change until staff check it in.
Handling Missing and Damaged Items
If an item on the holds pull list is missing or damaged, you can change its status directly from the holds pull list.
- From the Holds Pull List, right-click on the item and either select Mark Item Missing or Mark Item Damaged.
- Evergreen will update the status of the item and will immediately retarget the hold.
<id=”clearing_shelf_expired_holds”>
Clearing Shelf-Expired Holds
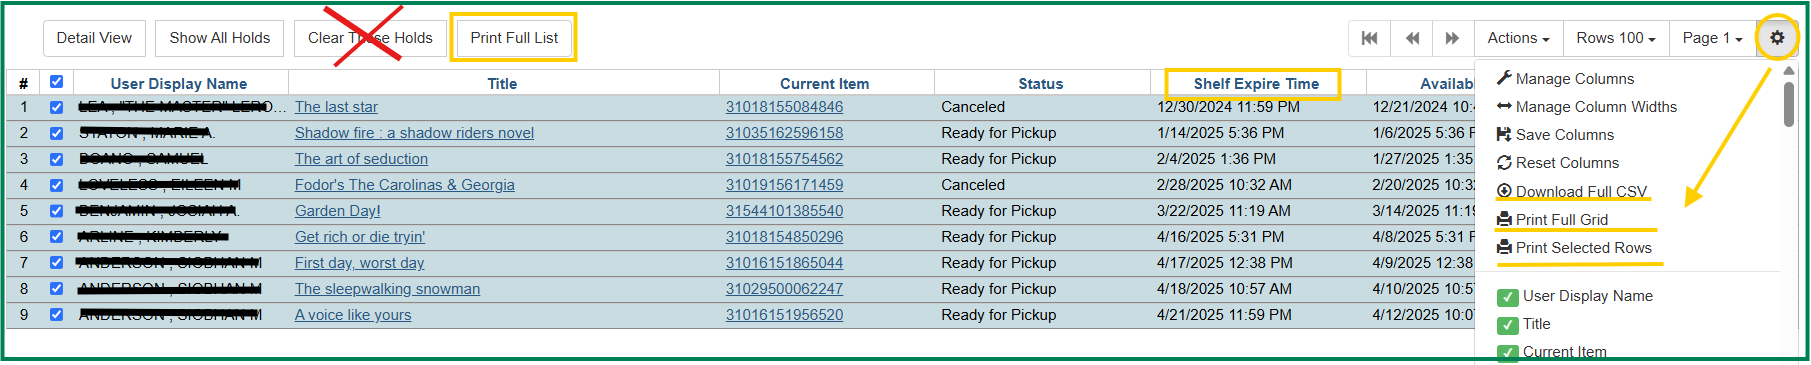
Patrons have 8 days to pick their holds up. After that time frame, holds are considered expired. However, there is no Hold Expired status, because while Evergreen knows that the item is on the Holds shelf, even if past the pick up date – it’s technically still available for pickup. This is why we need to regularly check the Hold Shelf in the “Show Clearable Holds” view.
In the Show Clearable Holds tab,
- Sort by the Expired Hold Shelf Column.
- Select expired holds, and then click the Print these holds button.
- Additionally, you can also open the Settings (gear icon) menu, and
- Download Full CSV (will open as a spreadsheet, and you can customize as needed)
- Print Full Grid
- Print Selected Rows
- Use the printed to pull the expired items off the shelf.
- Once you have the items off the shelf, you’ll need to open Checkin in a new tab.
- BEFORE you scan the items, open the Checkin Modifiers dropdown menu (bottom right corner) and turn on Clear Hold Shelf. This will remove the pre-existing hold status an free it up.
- Scan the items.
![]()
Edit Holds
Staff can cancel or edit holds anytime from either the patron’s record or from the Title Record’s “View Holds” tab. Patrons can cancel or edit their holds in their account on the OPAC or app. Edit options are:
- Edit Pickup Library: once a hold is captured, staff can change the pickup location. This can also be done for holds with in-transit status. The item will be sent in transit to the new destination. Staff cannot change the pickup location once an item is on the holds shelf.
- Edit Notification Settings: edit the notification phone number or email address.
- Edit Hold Dates: set a specific date for suspended holds to be activated on.
- Activate: un-pause suspended holds. Without an activation date, the holds will remain inactive until staff or a patron activates them manually.
- Suspend: pause the hold from being captured and made available. Suspended holds will not be filled but its hold position will be kept.
- Mark Item Damaged: edit the status to Damaged if the quality/condition is too poor to fill the hold.
- Mark Item Discard/Weed: mark this item for Discard/Weed if the item needs to be deleted from the catalog and/or replaced eventually.
- Mark Item Missing: edit the status to Missing if the item cannot be located anywhere.
- Find Another Target: If the item that was supposed to fill the hold is in too poor a condition or can’t be found, Find Another Target will tell Evergreen to find another copy to replace this hold without having to cancel it. (Note: If the wait time is too long for the replacement hold – send a helpdesk ticket to WLS IT and someone will move the patron to the top of the queue.)
- Cancel Hold: This will cancel the hold and move the hold into the Recently Cancelled Holds tab where it will be available to “Un-cancel for thirty days.”
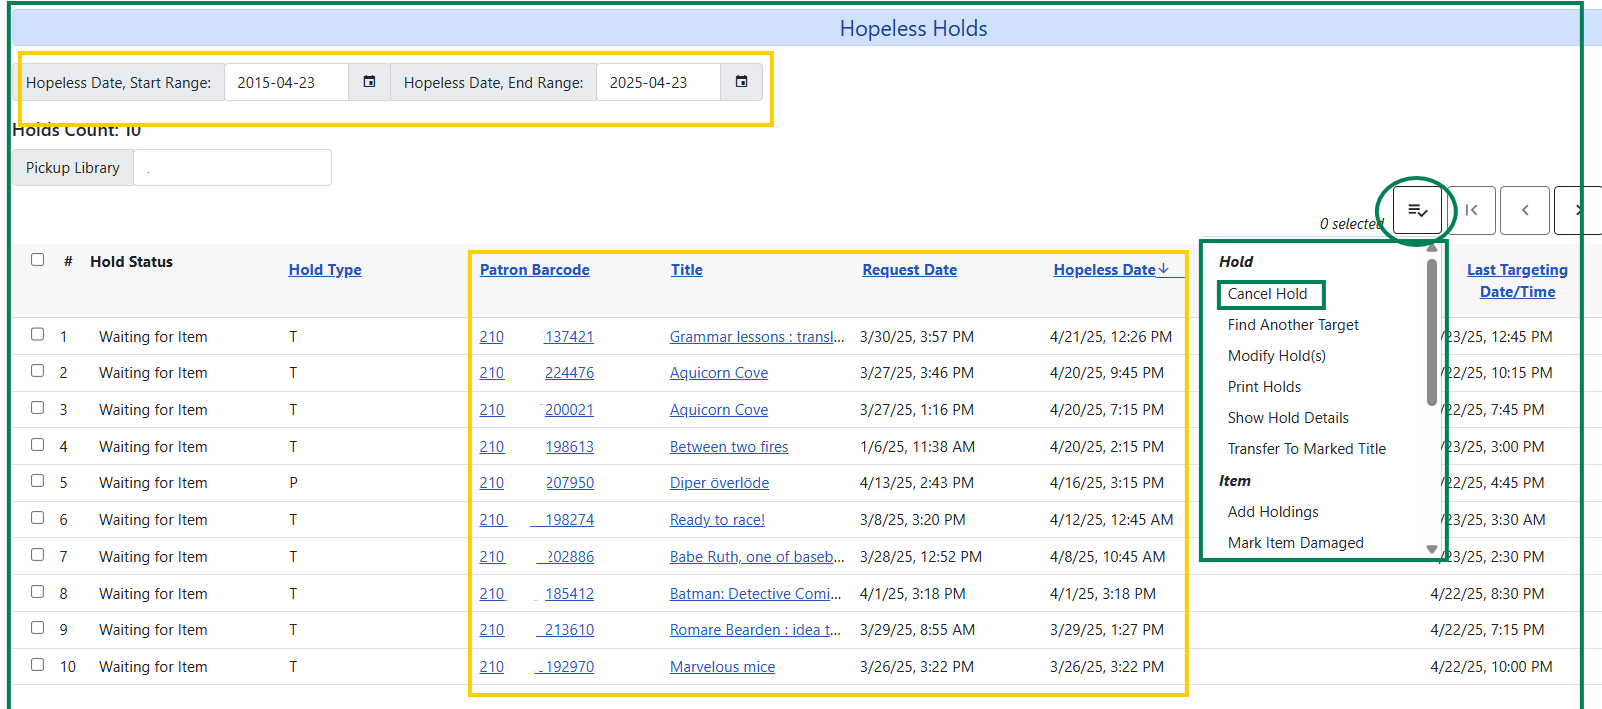
Hopeless Holds
Unfulfillable holds are colloquially known as “hopeless holds.” Holds become hopeless when there are no available copies that can fill a patron’s hold; typically this happens when the only copy linked to a title record is marked lost, or has been deleted form the catalog.
These need to be checked fairly regularly so that staff can contact patrons and let them know that the hold will not be filled.
From the Local Administration menu,
- Open the Hopeless Holds link.
- Make sure to have the following columns displayed: Patron barcode, Title, Request Date, and Hopeless Date
- Click on the linked Title. A new tab will open with the Title record summary, and you will be able to see what may be causing the hold to be hopeless (I.e. Lost status or no linked copies.)
- After verifying that there are no available copies in the catalog, go back to the Hopeless Holds interface and open the patron’s account by clicking on their barcode. Notify the patron that the hod needs to be cancelled due to no available copies. Optional: Offer to place an ILL request to have the book sent from outside of the system!
- Back at the Hopeless Holds page, select all hopeless holds, open the Actions menu, and cancel them.
Hold Queue Position
Staff can add the Queue position to any interface that displays holds. What’s important to keep in mind is that a patron’s place in the Hold Queue can shift, and sometimes dramatically depending on a few factors. If patron’s call to ask where they are in line or how long until they can get it, it’s best to give them a general answer, rather than a specific one.
Preferred Pickup location is usually going to bump people closer or further along the queue.